PfSense Captive Portal Installation


Hello Fellas ;
In this chapter we’ll discuss about Captive Portal (CP) installation and configuration on
PfSense Firewall.Let’s start with the definition of Captive Portal first.
Captive portal :A captive portal is a Web page that the user of a public-access network is obliged to view and interact with before access is granted. Captive portals are typically used by business centers, airports, hotel lobbies, coffee shops, and other venues that offer free Wi-Fi hot spots for Internet users.;
- Allowing a user how many time can be spent on the internet
- Dowload-Upload limitations
- Specify bandwidth of traffic to determining to limitations both D/U
- Defining rules that which days and which hours can be allow to acces to the internet
- Allowing a specific user for a specific timeline to use internet.
1-) To configurate Captive Portal ; Service->Captive Portal in this section we’ll create a new zone to do this click on +

Give a zone name then click on “continue”

2-) Click on Zone name and then enable Captive Portal in this tutorial I’ll select the interface as LAN and mark the yellows


Authentication In this article we look at the party will be part of the Local User Manager will use these options if we will take a short look;
- No Authentication
- Local User Manager /Vouchers
- RADIUS Authentication
No Authentication
Users of any authentication process performed during access to internet.
Local User Manager
With these options, you can perform authentication by users on your local network.
RADIUS Authentication
If, in your environment, if there is a RADIUS server that you have already configured, you can perform authentication on this server. I, the Local User authentication process will continue through the Manager.
3-) We call the Local User Manager and Authentication tab in our system, we create a new user.

We create a new user by pressing the + button on the page that opens.
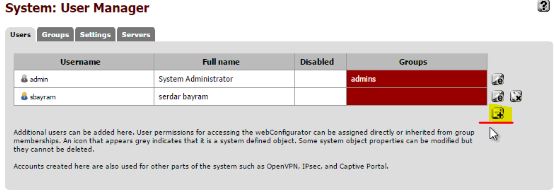
I enter the user name and set a password for the user as follows.
I set the following 2 users system.

4-) Now we want to access the Internet from a machine on the network, we provide the following as a user name and password screen before us comes here we just select the user account by entering our machine one of the emergence of the internet.

We provide our successful entry into the Internet as follows.
5-) Now Captive Portal users to view the Internet via IP addresses and MAC addresses
Status -> we choose depends on Captive Portal and captive portal users access görüntüleyel as follows.
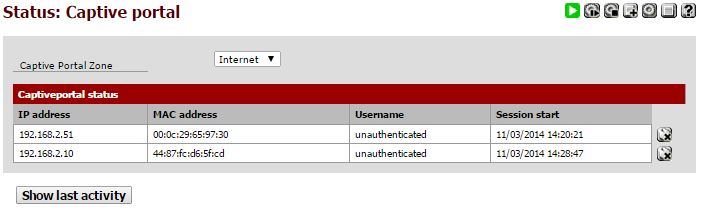
Or you can make monitoring more effective by adding a Dashboard in this panel.

I hope we finish our article on Captive Portal installation has been useful.
Serdar BAYRAM