AWS üzerine OpenVpn Kurulumu
AWS Üzerinde Güvenli OpenVPN Kurulumu ve Lets Encrypt yapılandırması : Adım Adım Rehber
VPN Nedir?
VPN (Virtual Private Network), kullanıcıların genel internet altyapısını kullanarak özel bir ağ üzerinde güvenli ve şifreli bağlantılar kurmasını sağlayan bir teknolojidir. VPN sayesinde, internet üzerinden veri iletimi esnasında güvenlik artırılır ve kurum içi kaynaklara uzaktan erişim sağlanabilir. Bu teknoloji, özellikle şirketlerin uzaktan çalışan personellerine, ofis dışından güvenli erişim sunmak amacıyla yaygın olarak kullanılır. Ayrıca, veri gizliliği, coğrafi kısıtlamaların aşılması ve güvenli iletişim için de bireyler ve kurumlar tarafından tercih edilir.
OpenVPN Nedir ve AWS Üzerinde Kullanımı

OpenVPN, açık kaynaklı, güçlü ve esnek bir VPN protokolüdür. Hem istemci hem de sunucu tarafında çalışabilir ve yüksek seviyede şifreleme ile güvenli bağlantılar sağlar. AWS Marketplace üzerinden kolayca dağıtımı yapılabilen OpenVPN Access Server çözümü, bulut ortamında güvenli bir uzaktan erişim altyapısı kurmak için ideal bir seçenektir. AWS üzerinde OpenVPN kurulumu ile farklı lokasyonlardaki kullanıcılar, sanal özel ağ (VPC) içindeki kaynaklara güvenli şekilde erişebilir. Bu sayede hem ağ güvenliği artırılır hem de merkezi bir erişim yönetimi sağlanmış olur.
Bu makalede openvpn i aws hesabımız üzerine kurulumunu inceliyor olacağız.
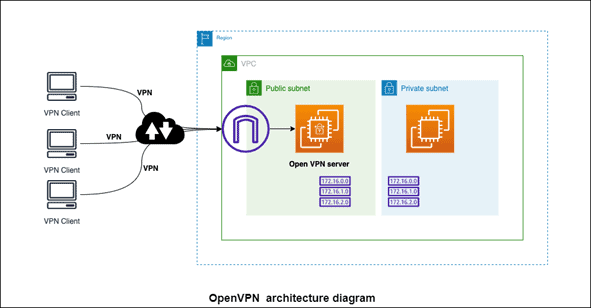
Kurulum için Gereksinimler
- OpenVPN sunucusunun konuşacağı bir adet genel (public) subnet bulunmalıdır.
- Subnet’e bağlı bir Internet Gateway tanımlanmış ve route table ile ilişkilendirilmiş olmalıdır.
- Aşağıdaki kuralları içeren bir Security Group oluşturulmalıdır:
- TCP 22 → SSH erişimi (sadece yönetici IP’lerine açık olmalı),
- TCP 443 → OpenVPN Web arayüzü ve VPN bağlantısı (Any Access)
- UDP 1194 → OpenVPN istemcileri için (Any Access)
- TCP 943 → Web arayüzü yönetimi için.
- Sabit IP adresi için bir Elastic IP tahsis edilmeli ve EC2 instance’ına atanmalıdır (Opsiyonel)
- Kullanıcı erişimini kolaylaştırmak için bir domain adı tanımlanabilir ve Elastic IP’ye DNS yönlendirmesi yapılabilir.(Opsiyonel)
Kuracağımız yapının genel topolojisi aşağıdaki gibi olacaktır.
AWS Maliyeti: makine bağlantısız boş durumda çalışır durumdayken 1 günde 0,47$-0,64$ maliyet çıkarmakta.
Bu kadar ön bilgi ve açıklamadan sonra kuruluma geçebiliriz.
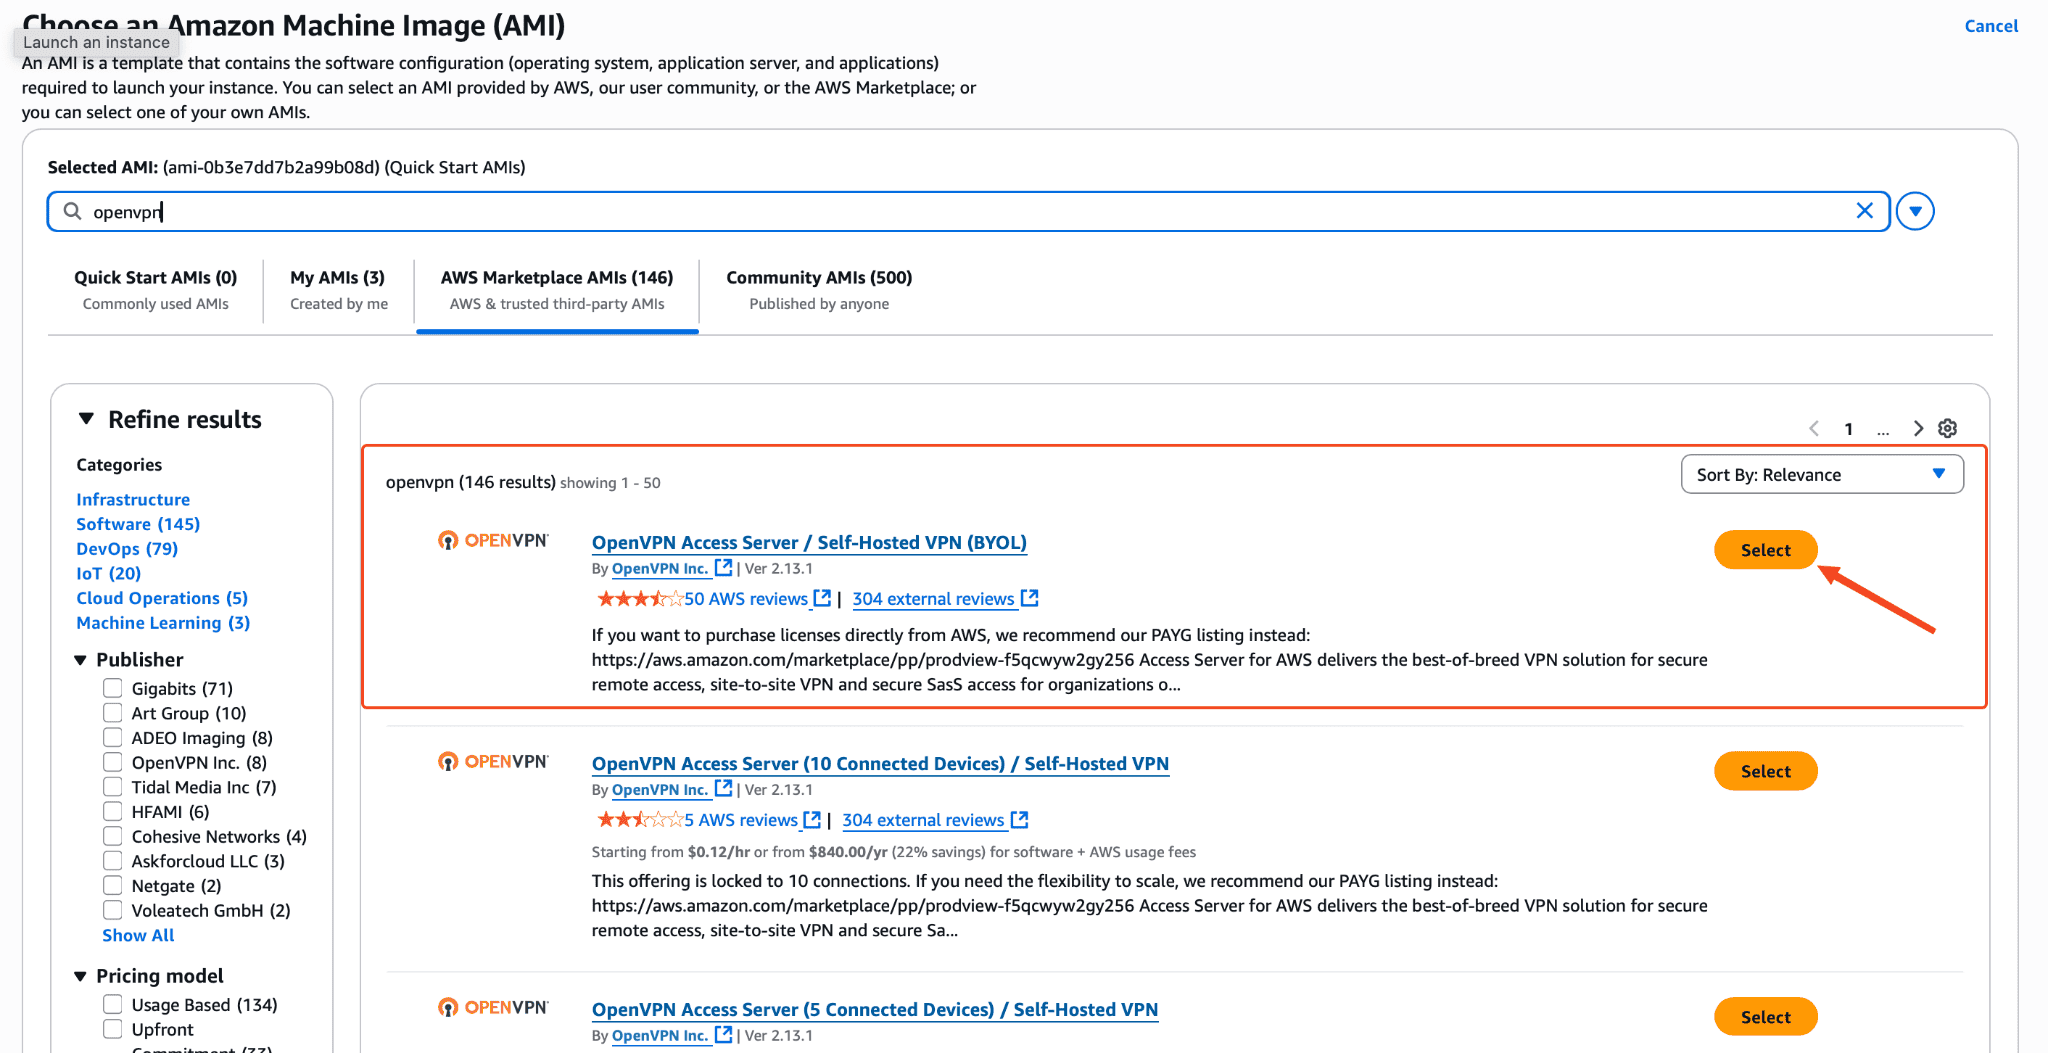
AWS Marketplace ten openvpn kurulumu
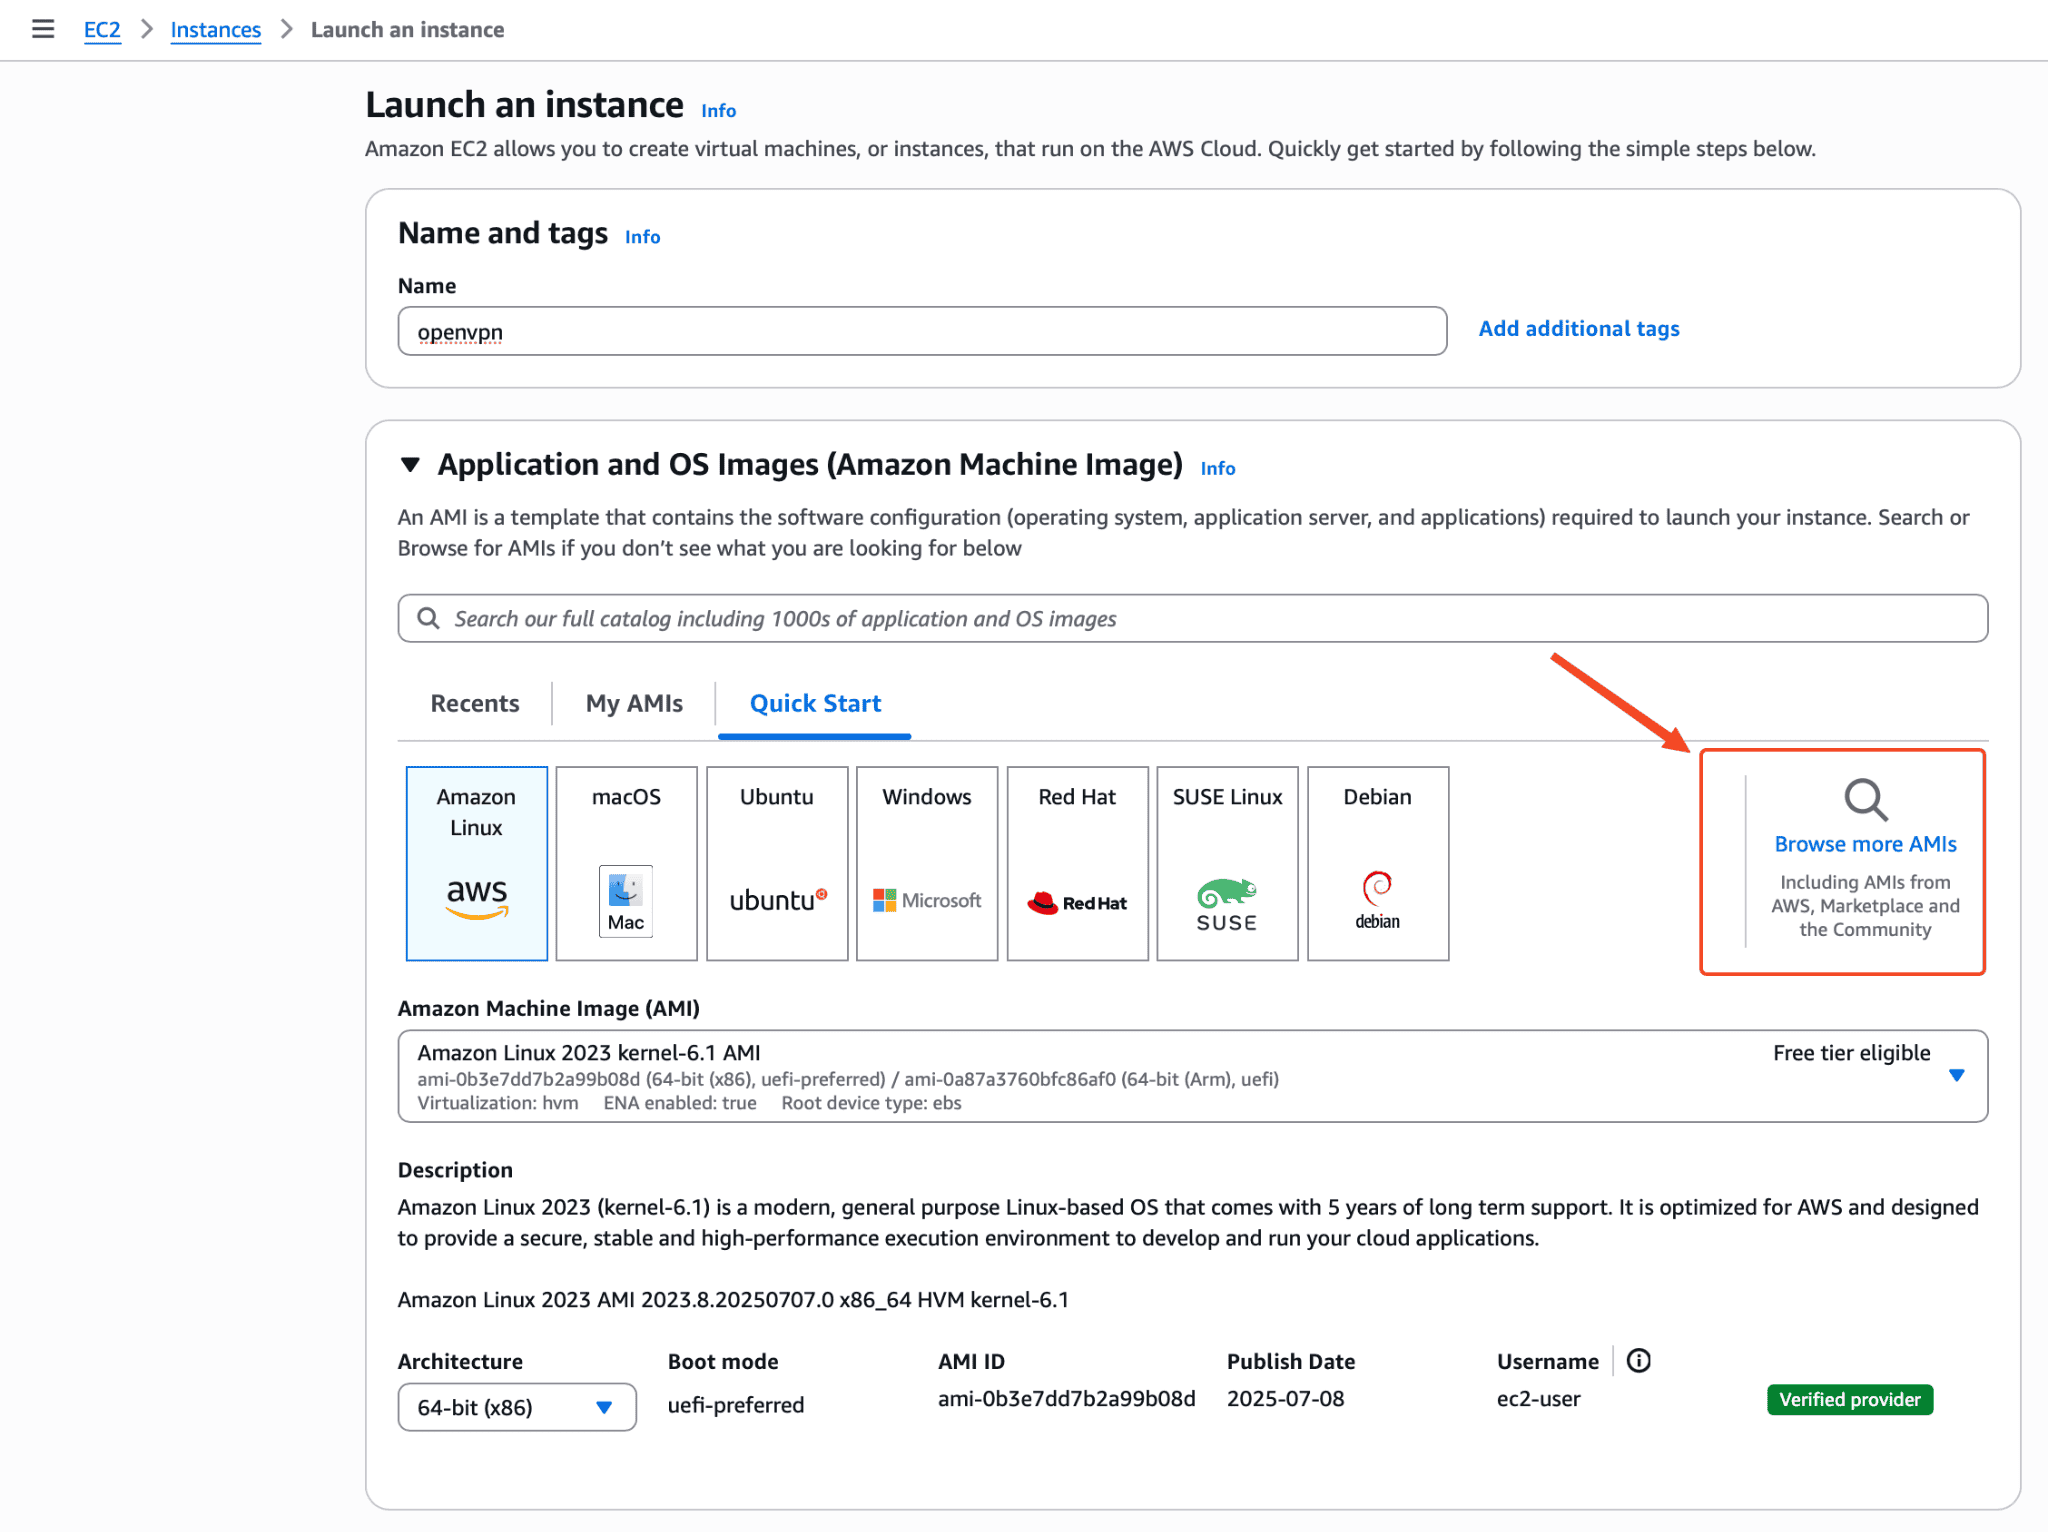
Search bölümüne “openvpn” yazıyoruz ve BYOL yazanı seçiyoruz.
Kurulum için

Yoğun ve çok sayıda kullanıcı ile çalıştıracaksanız aşağıdaki instace typelardan size uygun olanı seçebilirsiniz ben default ile devam ediyorum. 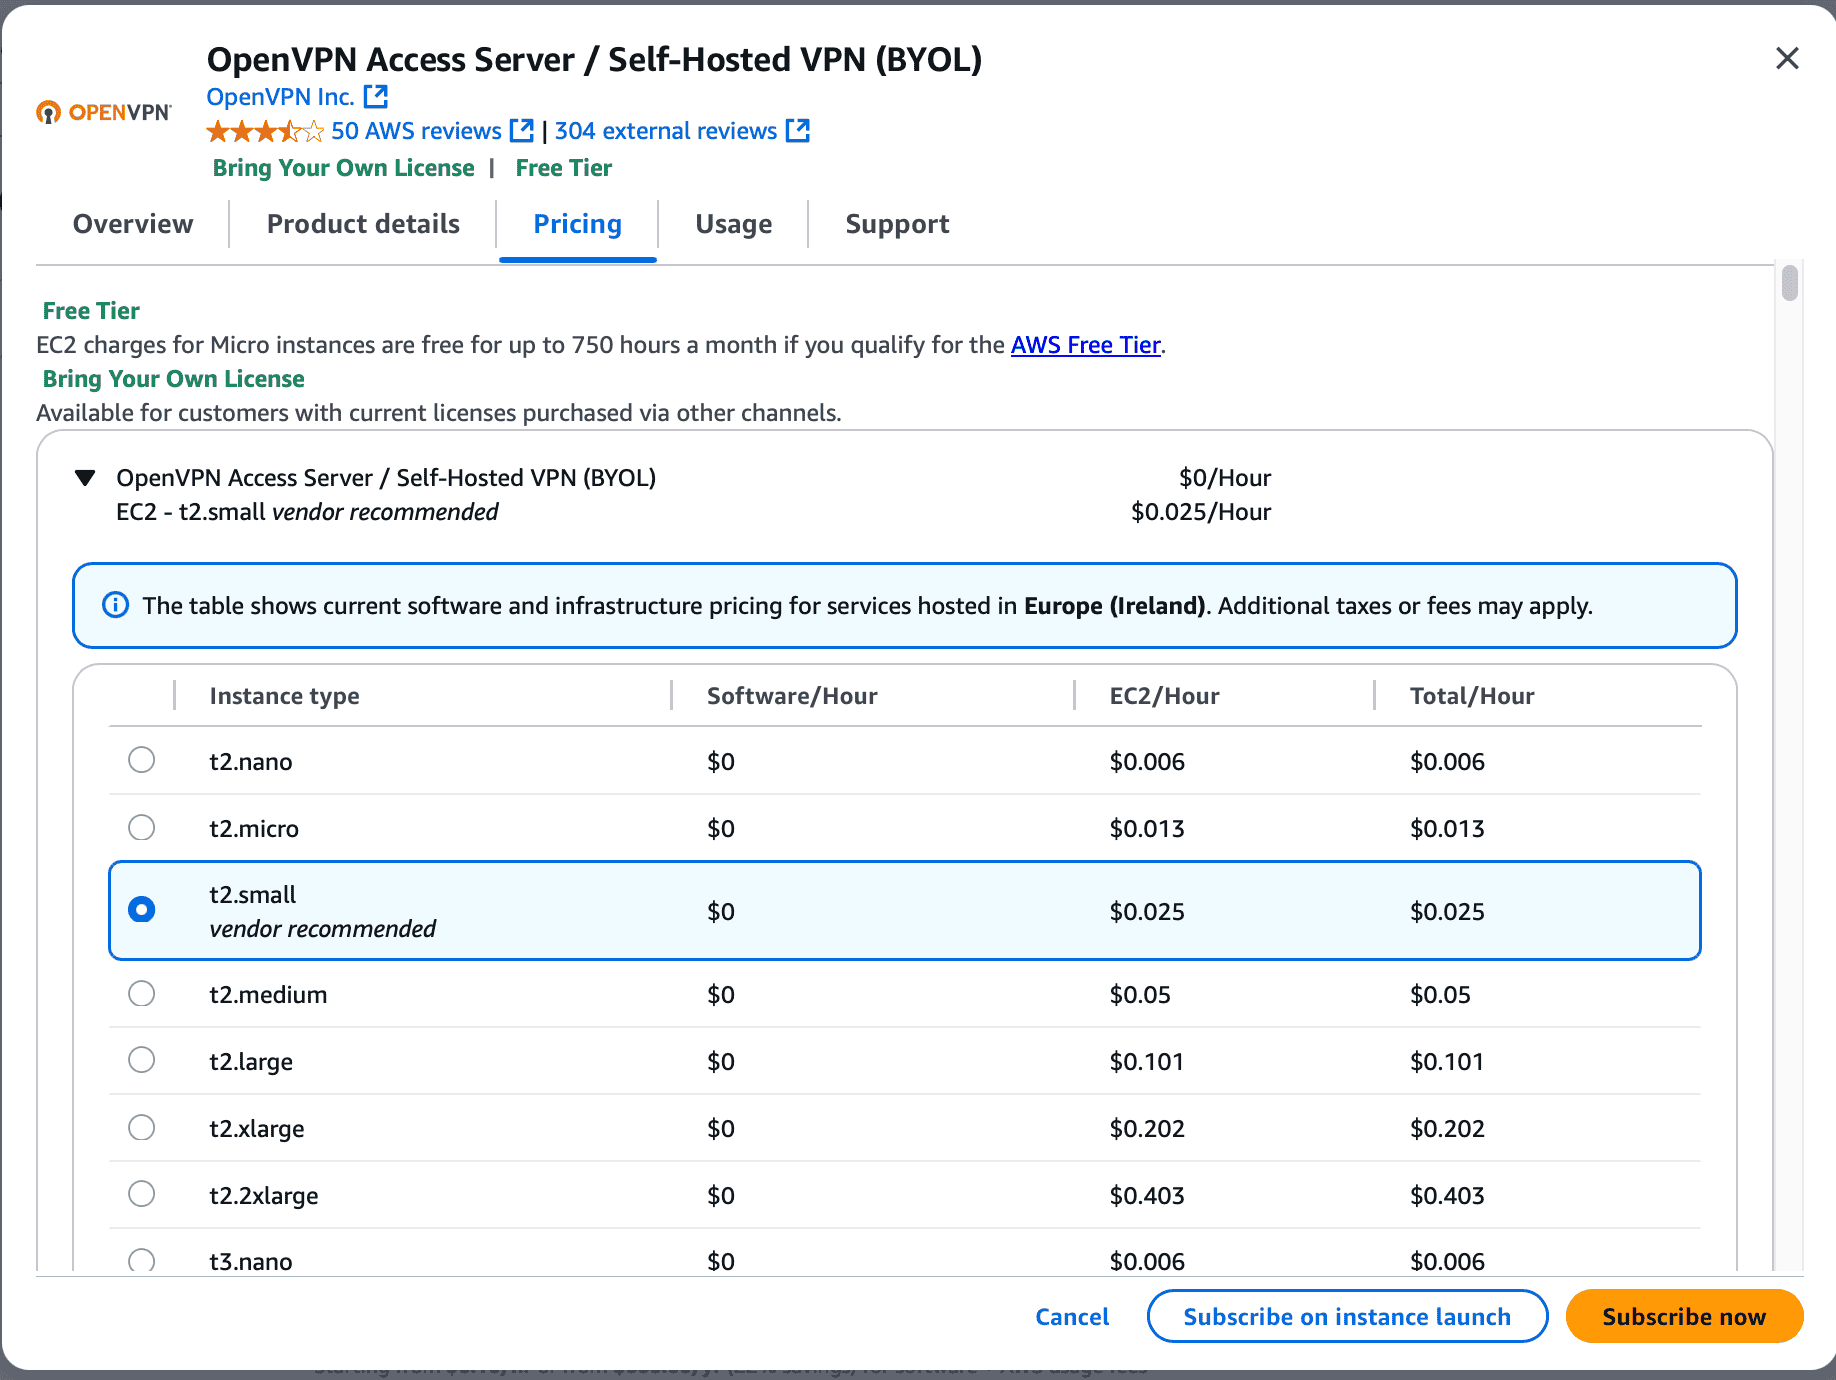
Subscribe on instace launch diyerek devam ediyoruz.
Ec2 config ekranında ssh için bir pem key oluşturmalısınız yada varsa buraya eklemelisiniz.
Network ayarlarınızı kendi vpc nize göre yapılandırmanız gerekiyor.
Default olarak sizin için bir SG tanımı yapılıyor fakat bunu kendiniz oluşturup buraya atayabilirsiniz.
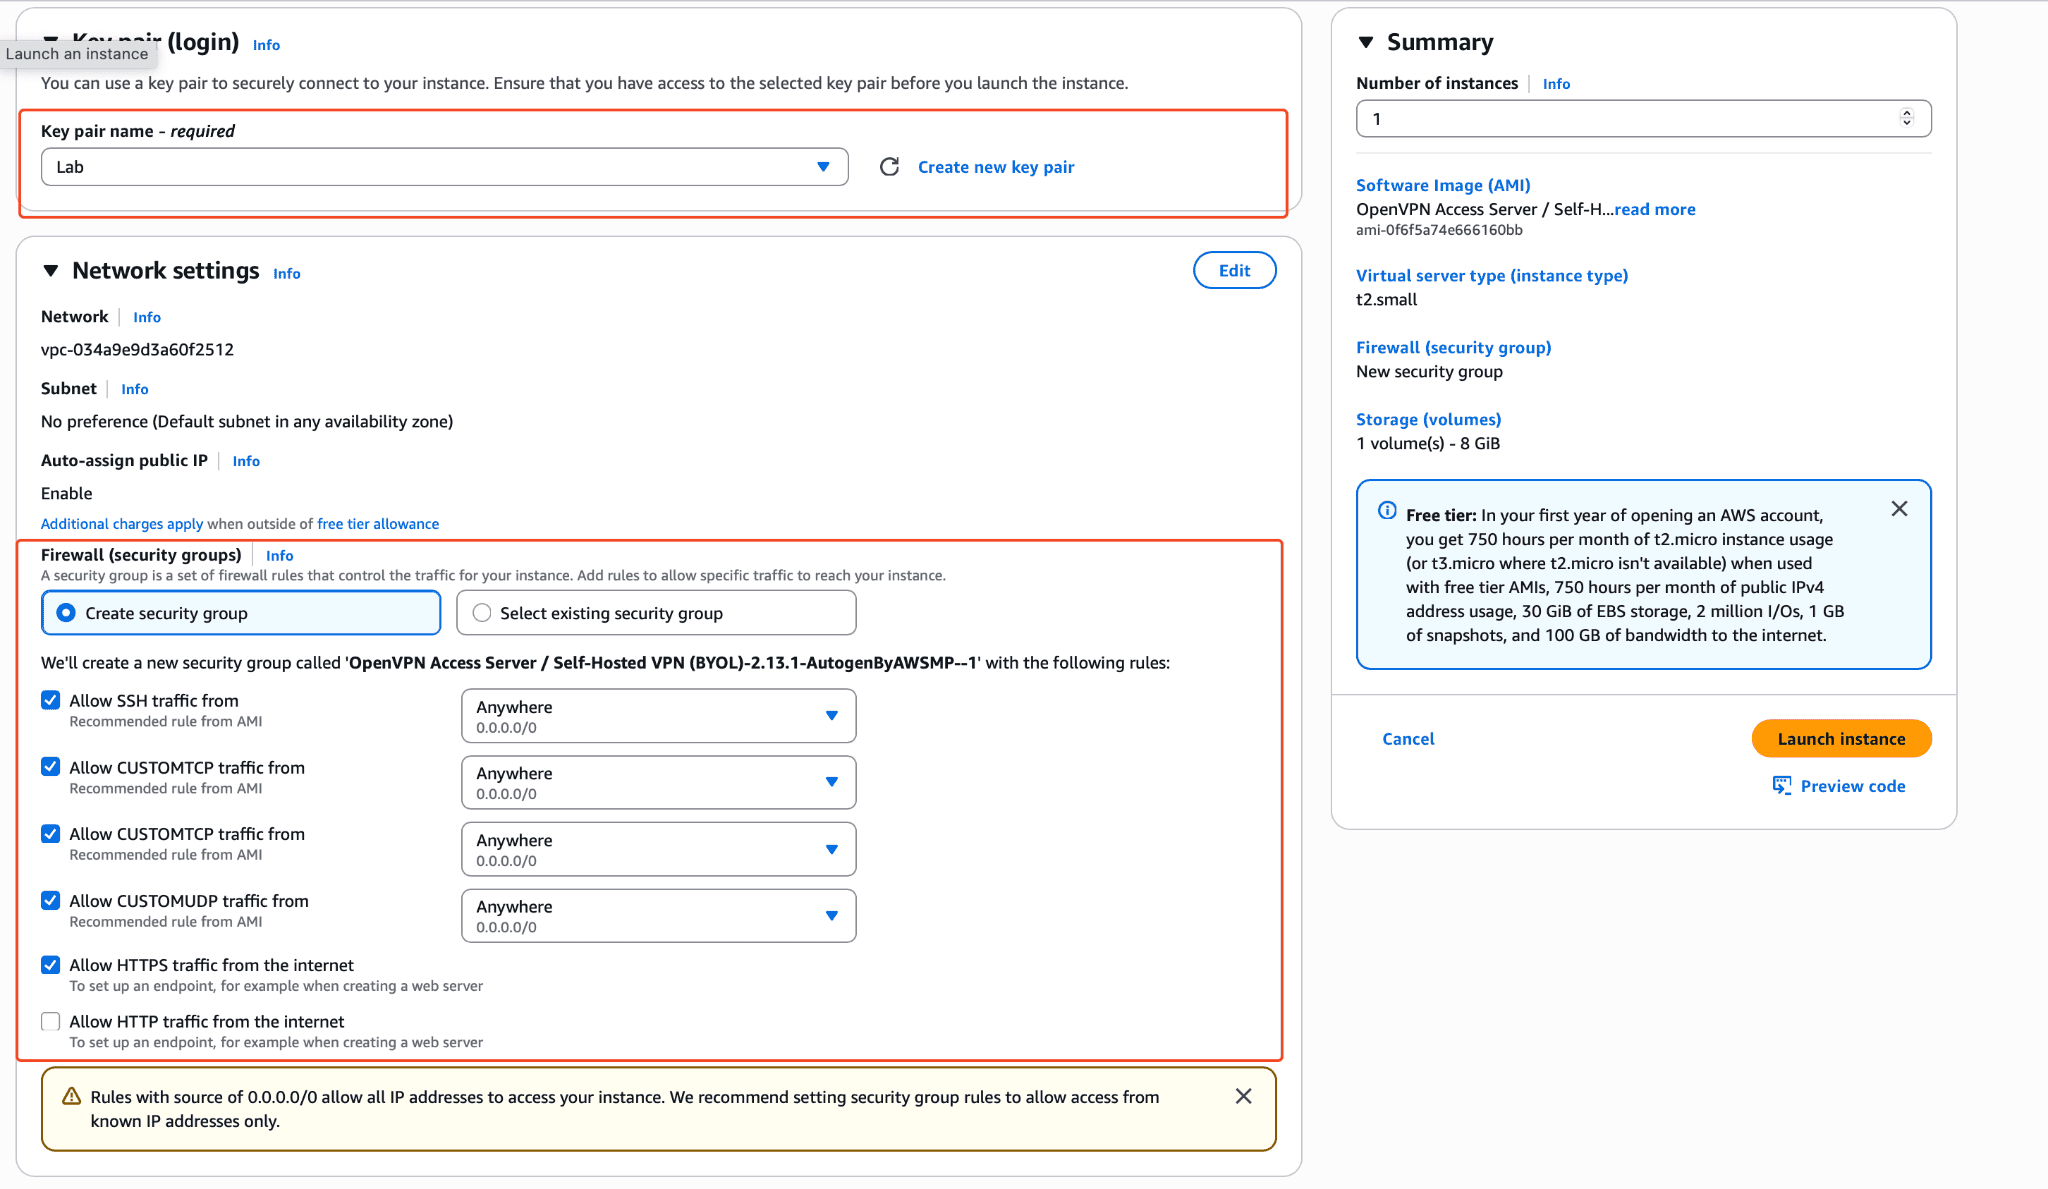
Son olarak launch diyerek makinemizi yaratıyoruz.
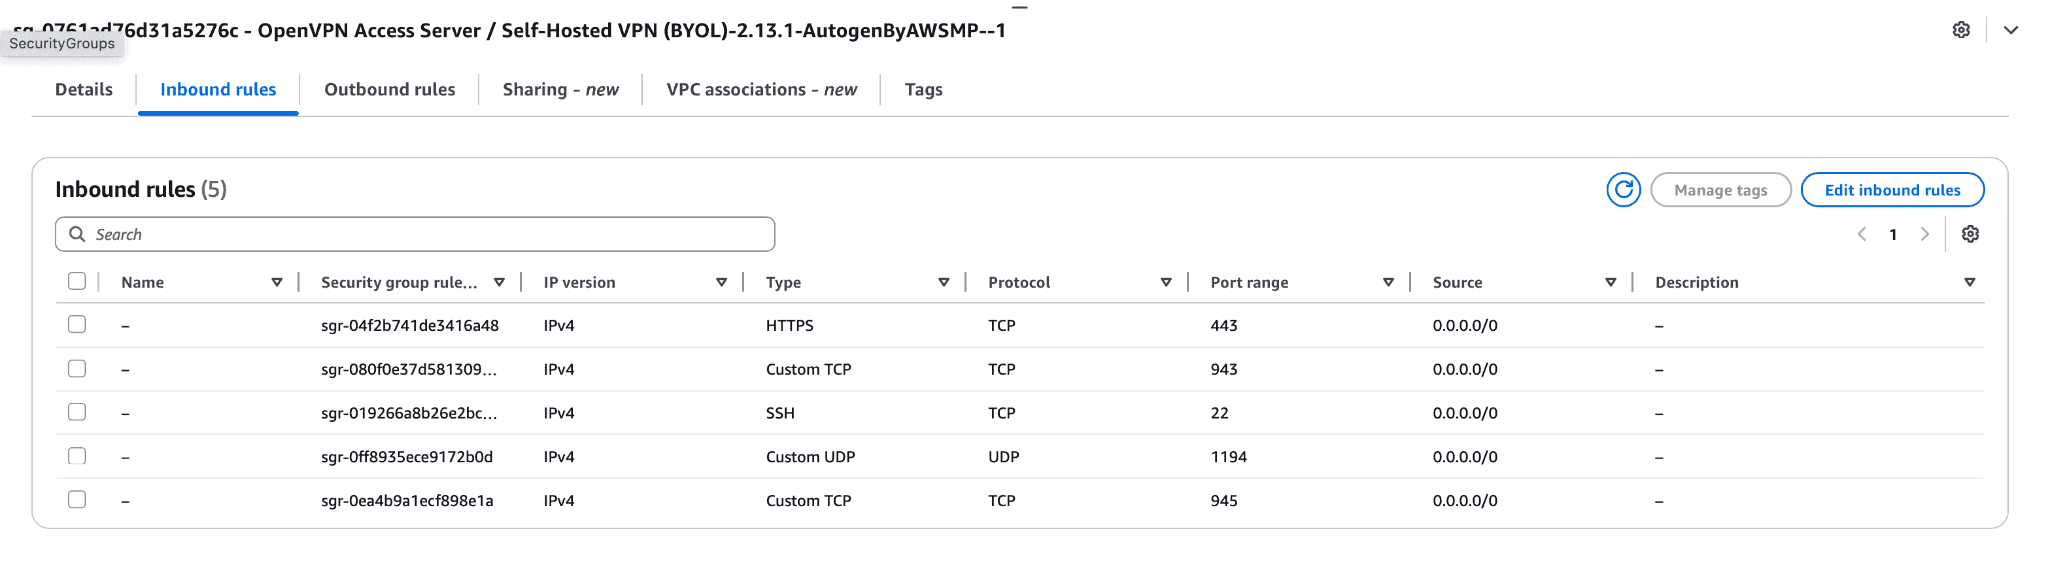
Makinemiz kurulduğunda aşağıdaki şekilde SG kurallarını otomatik olarak oluşturuyor

Makinemiz kurulduktan sonra “openvpnas” kullanıcısıyla makinemize ssh yaparak bağlanıyoruz.
| ssh -i Lab.pem openvpnas@3.250.127.234 |
|---|
aşağıdaki şekilde bir sözleşmenin olduğu ekran bizleri karşılıyor ve yes diyerek devam ediyoruz.


Aşağıdaki bölümleri default configlerde bırakarak devam ediyorum. Burada openvpn client networke dağıtılacak subneti değiştirmek isterseniz burada düzenleme yapabilirsiniz. 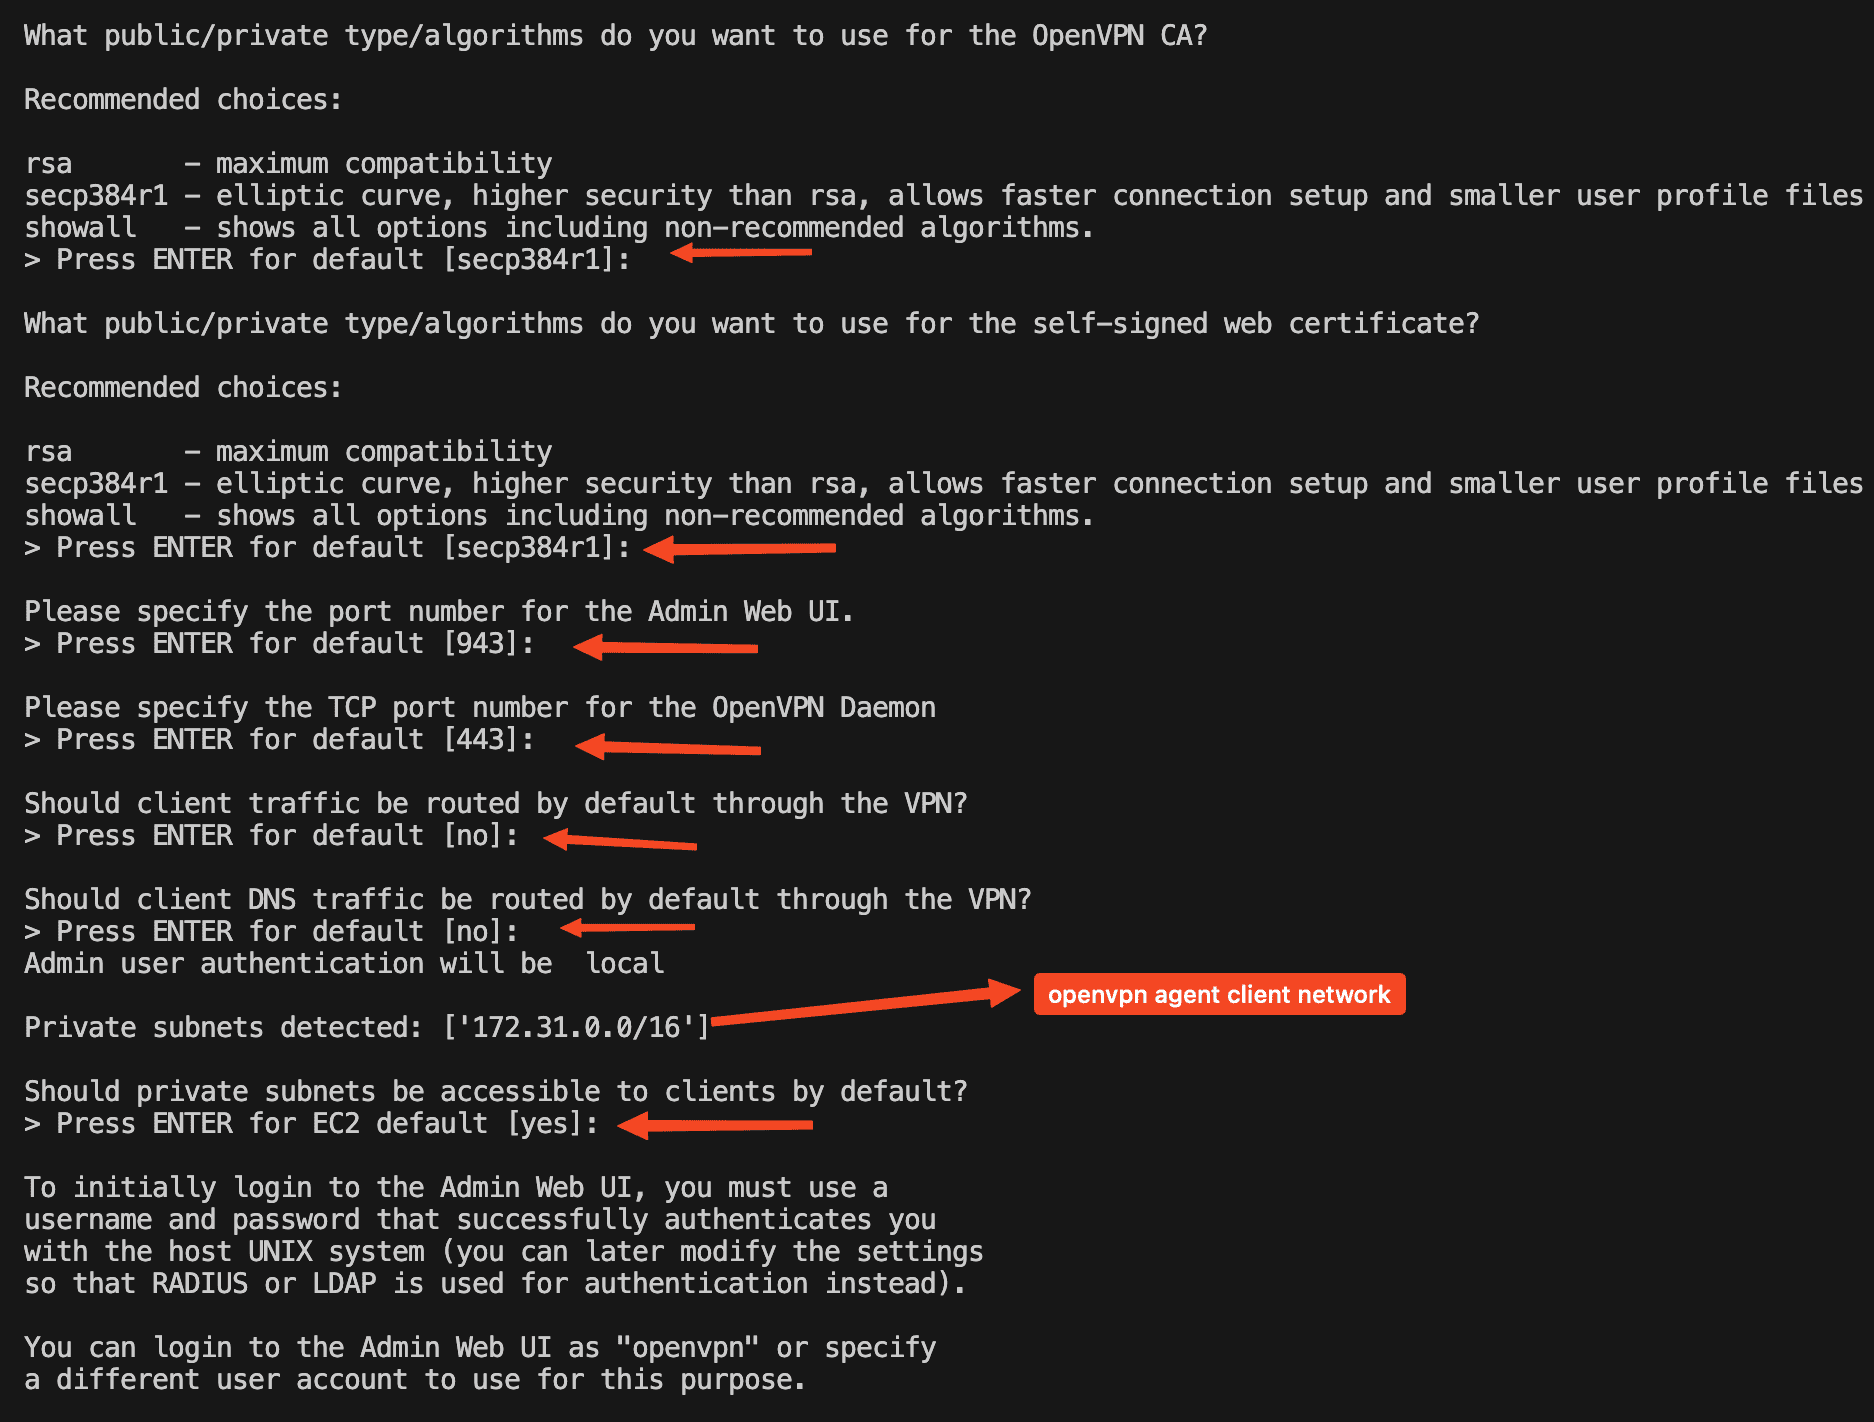
Son adımda admin parolamızı belirliyoruz.
Tüm adımlar tamamlandığında aşağıdaki şekilde kurulum tamamlanıyor.

artık vpn erişimini sağlayabilirsiniz.

username: openvpn
Pass : kurulum adımında verdiğiniz şifre
karşınıza bir sözleşme geliyor bunu kabul ederek devam ediyoruz.

Login sonrası sizler aşağıdaki ekran karşılıyor

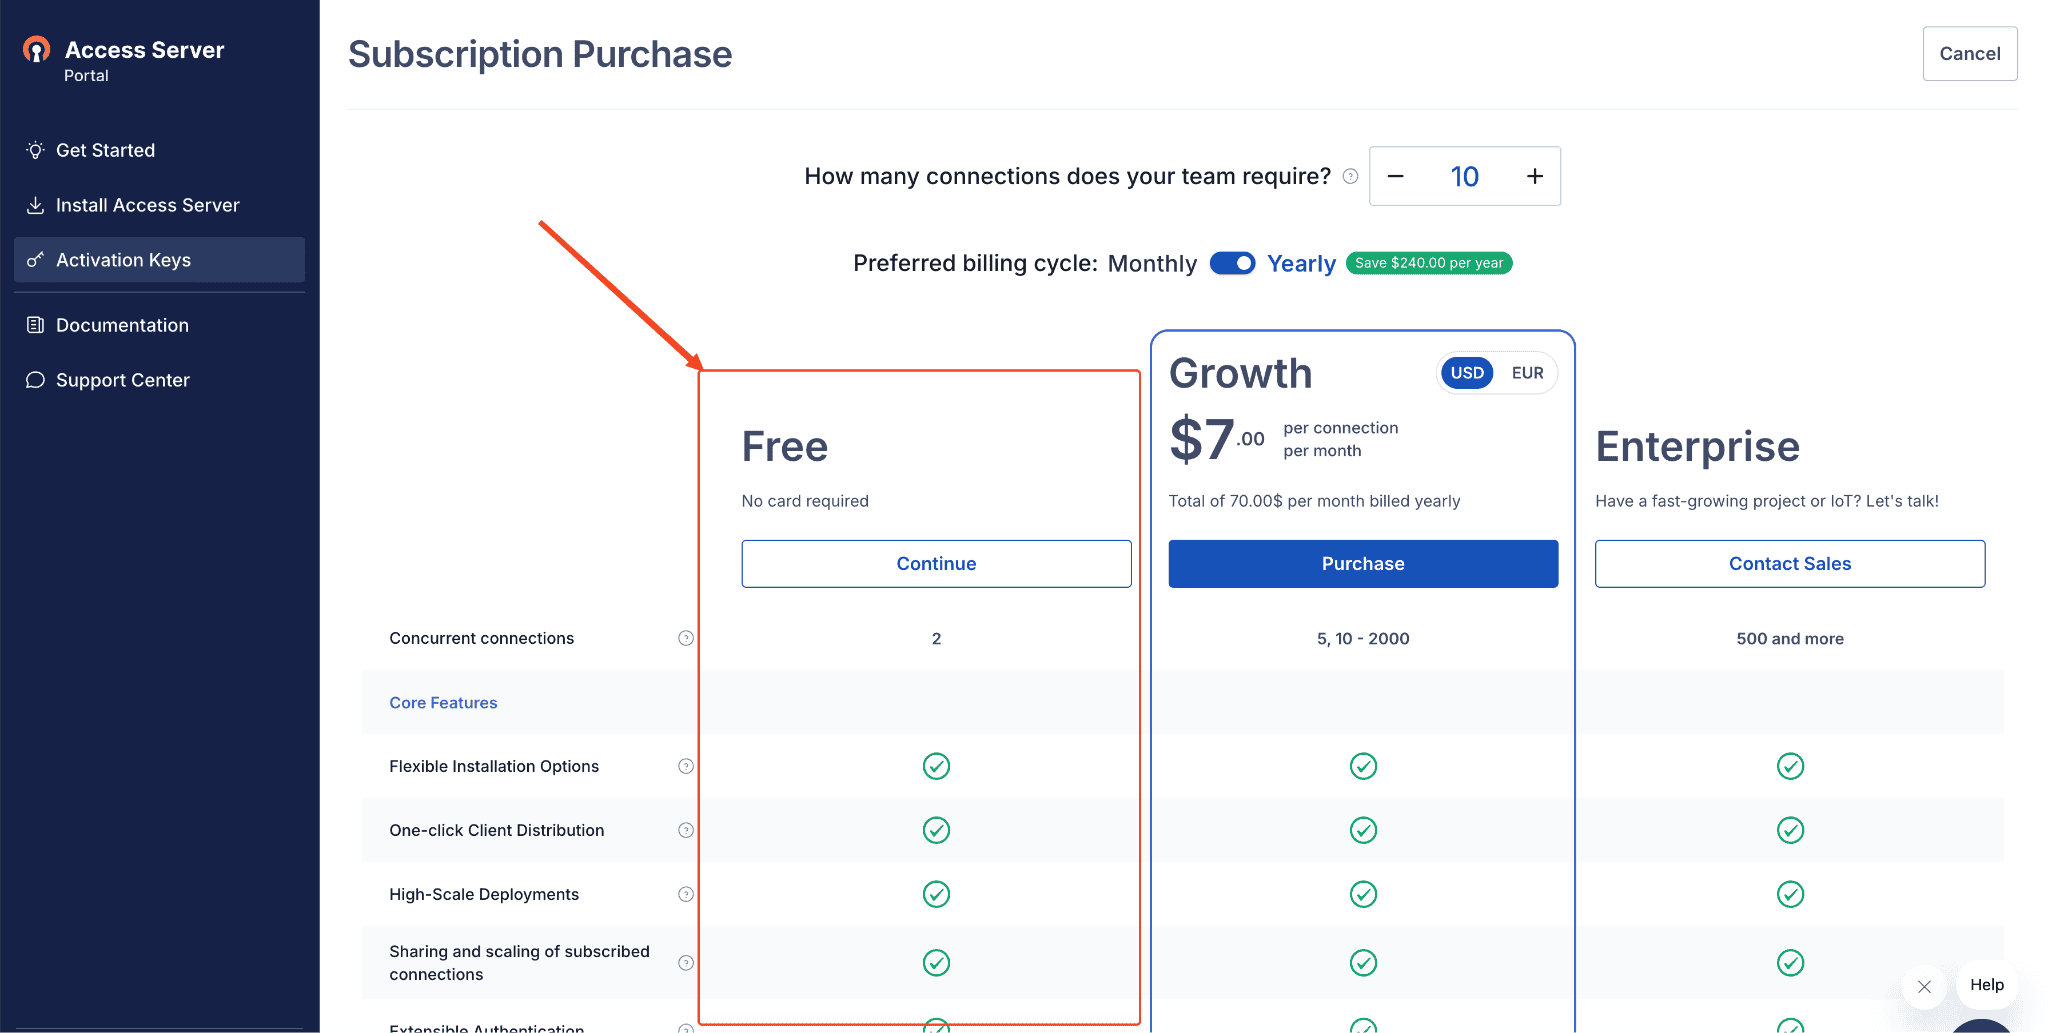
Burada openvpn portalına giderek bir hesap açmanız gerekiyor böylece 2 cihaza kadar free kullanım için lisans alabiliyorsunuz.
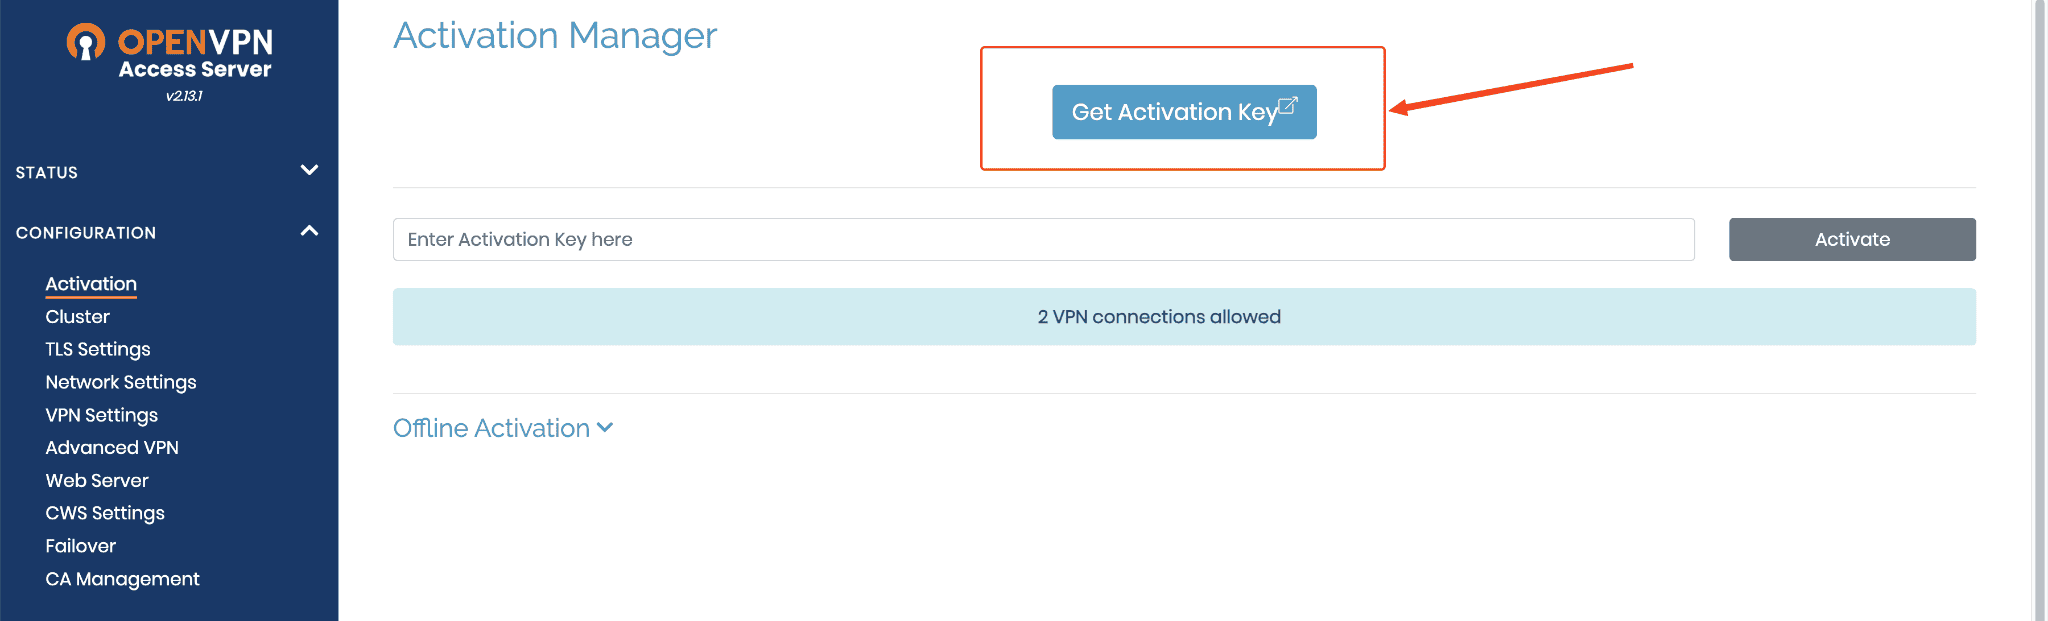
Free lisans için openvpn de bir hesap açtık ve “access Server” bölümünü seçerek devam ediyoruz.

Aktivasyon key i alıp kurduğumuz vpn servera giriyoruz.

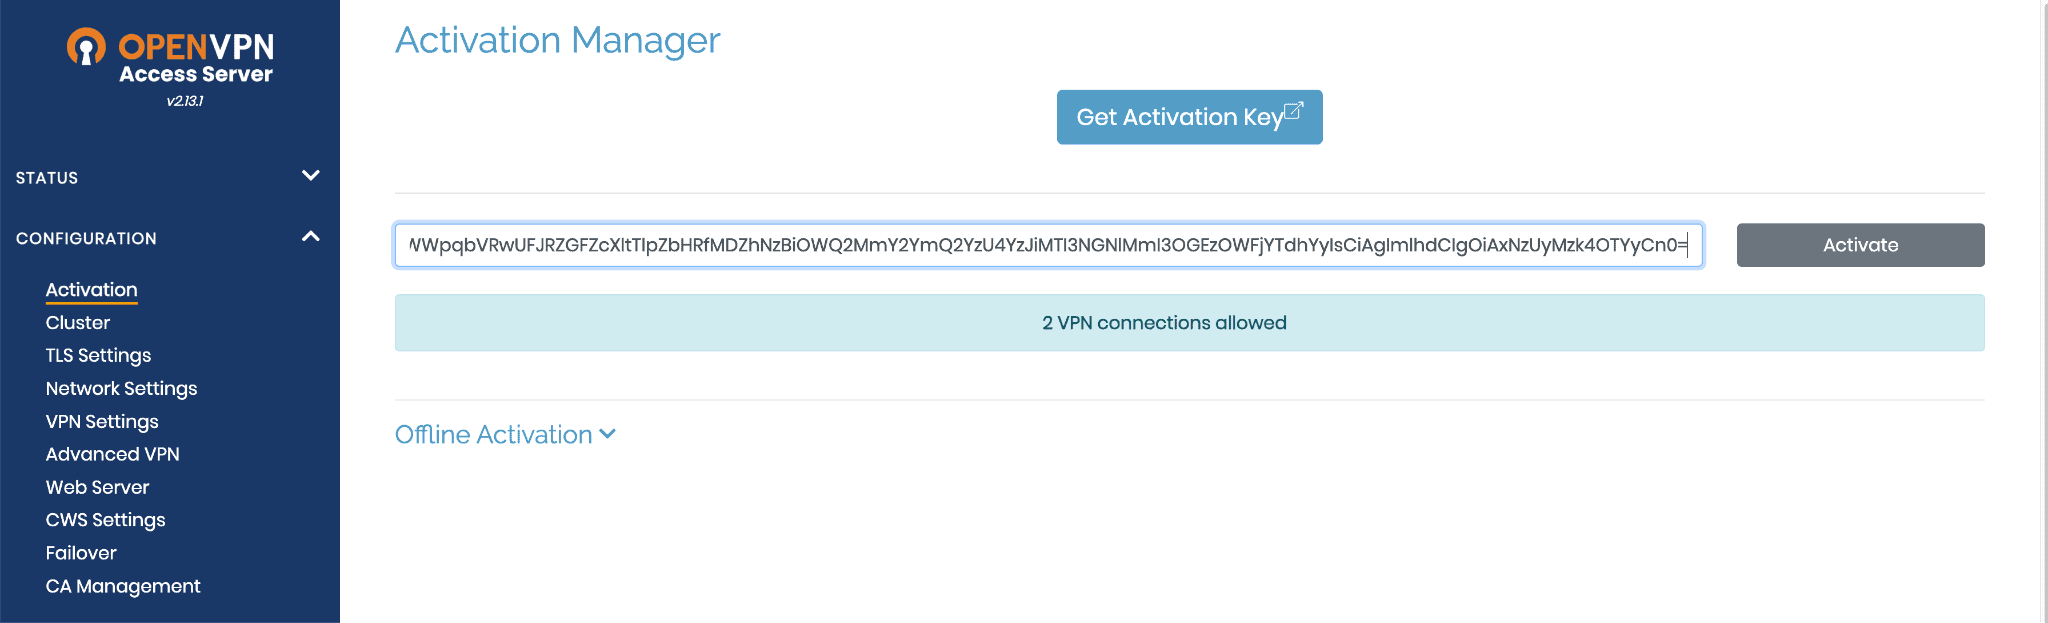
işlem sonrası 2 cihaz kullanımı için aktivasyonumuz yapılmış durumda artık vpn imizi rahatlıkla kullanabiliriz.

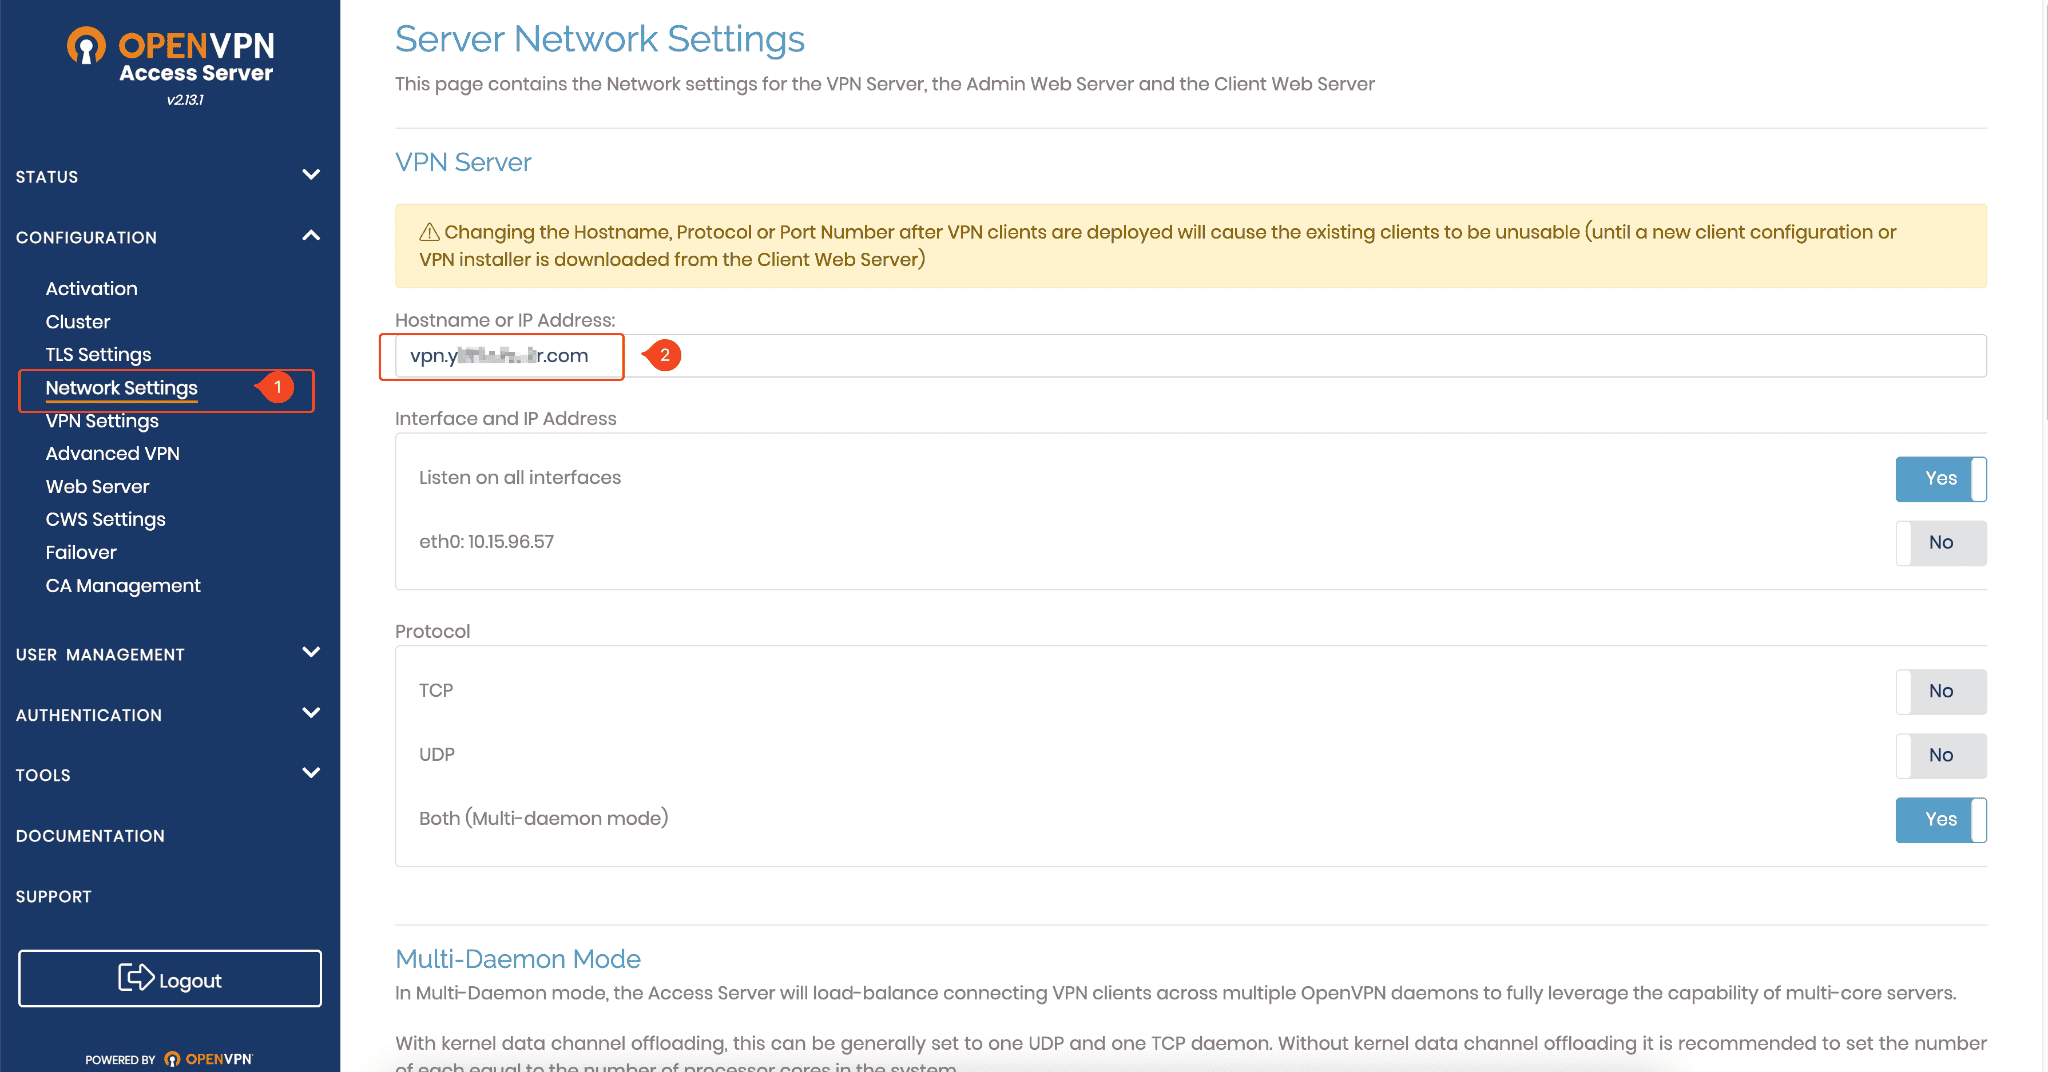
vpn network config
Configuration → Network Settings
Menüsüne gidiyoruz buraya vpn serverımızın ip adresi yada FQDN bilgisini yazıyoruz. Bu kısım çok önemli çünkü buraya girdiğiniz adres client makinelerin indirdiği openvpn client uygualmasının içerisine bundle olarak yazılıyor.
Yani siz bu adresi daha sonra değiştirirseniz tüm client makinelerde agentları silip tekrar güncellemeniz gerekir. Ip adresleri değişebilir bu sebeple buraya FQDN yazmanız çok daha uygun olacaktır.
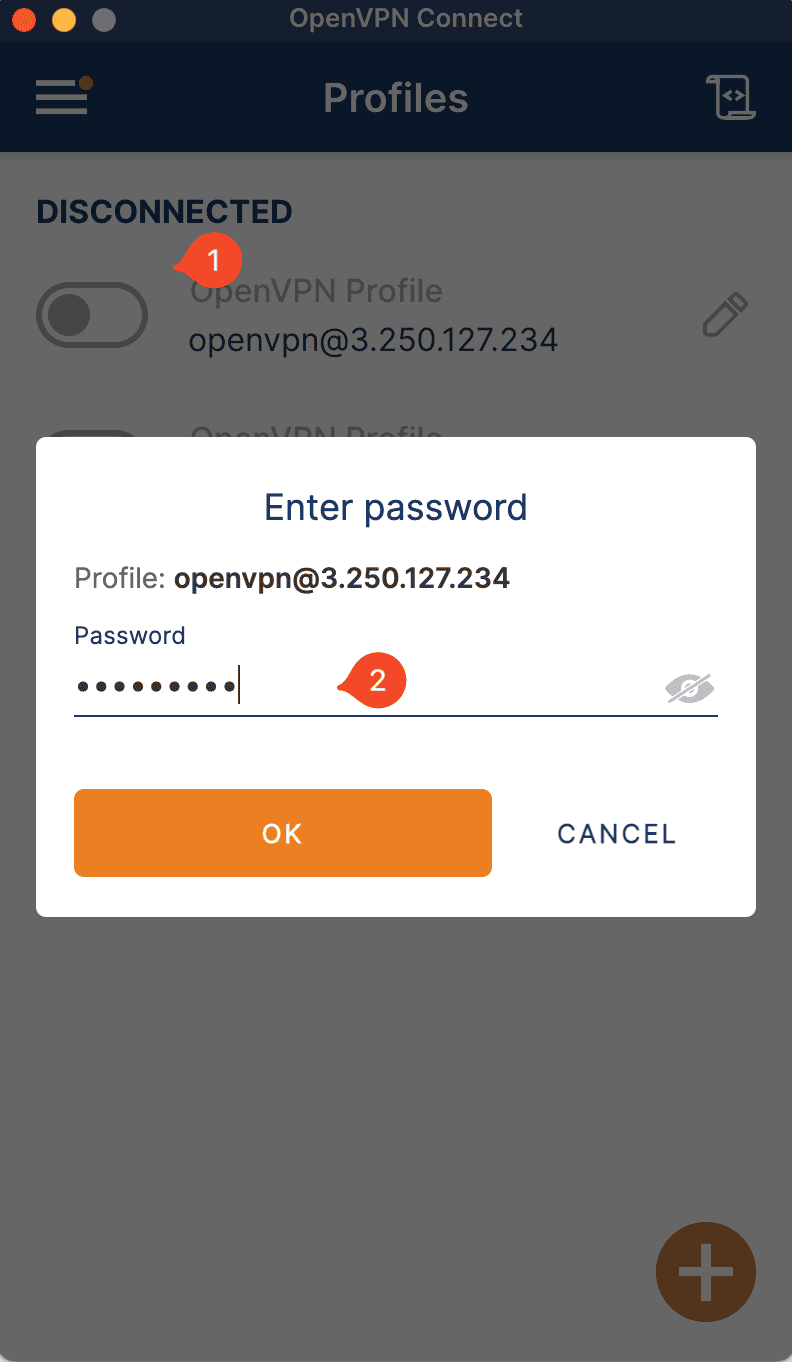
Client vpn yapılandırması
openvpn serverımızın ip adresini girerek bizi karşılayan ekranda hesap bilgilerimizi giriyoruz.
burada cihazımıza uygun vpn client uygulamasını indiriyoruz.

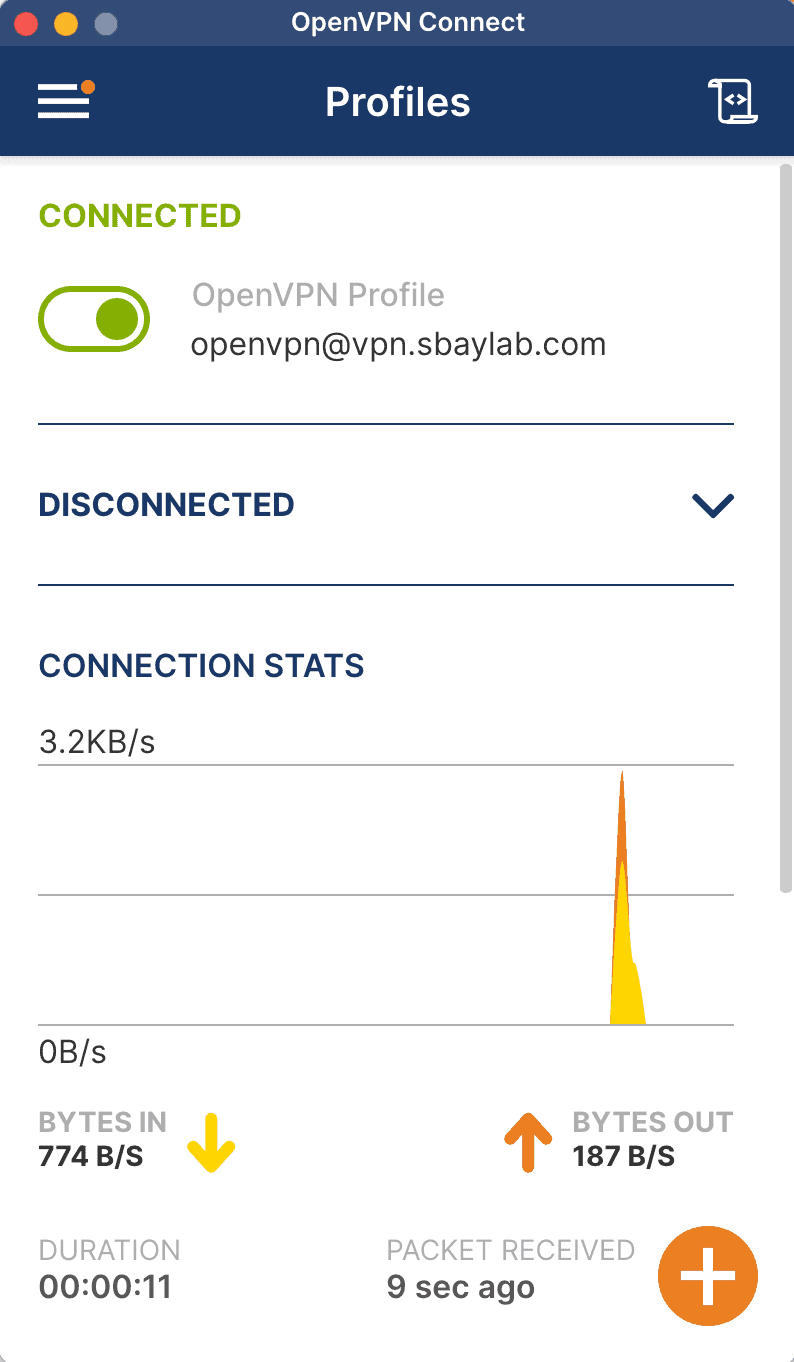
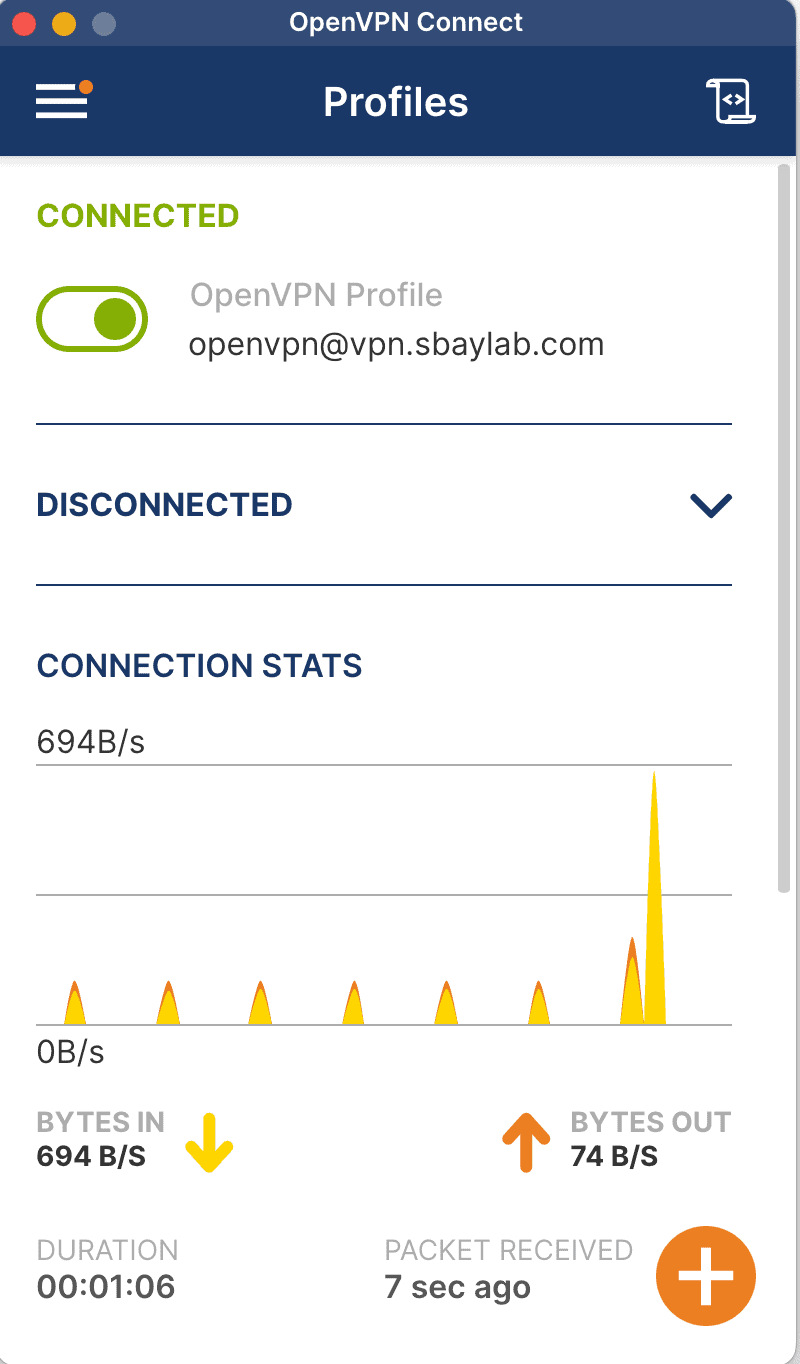
Agent ı indirip kurulumunu yaptık ve oluşturduğumuz user ile giriş yaptık ben default “openvpn” kullanıcı ile bağlandım.
 |  |  |
|---|---|---|
 | 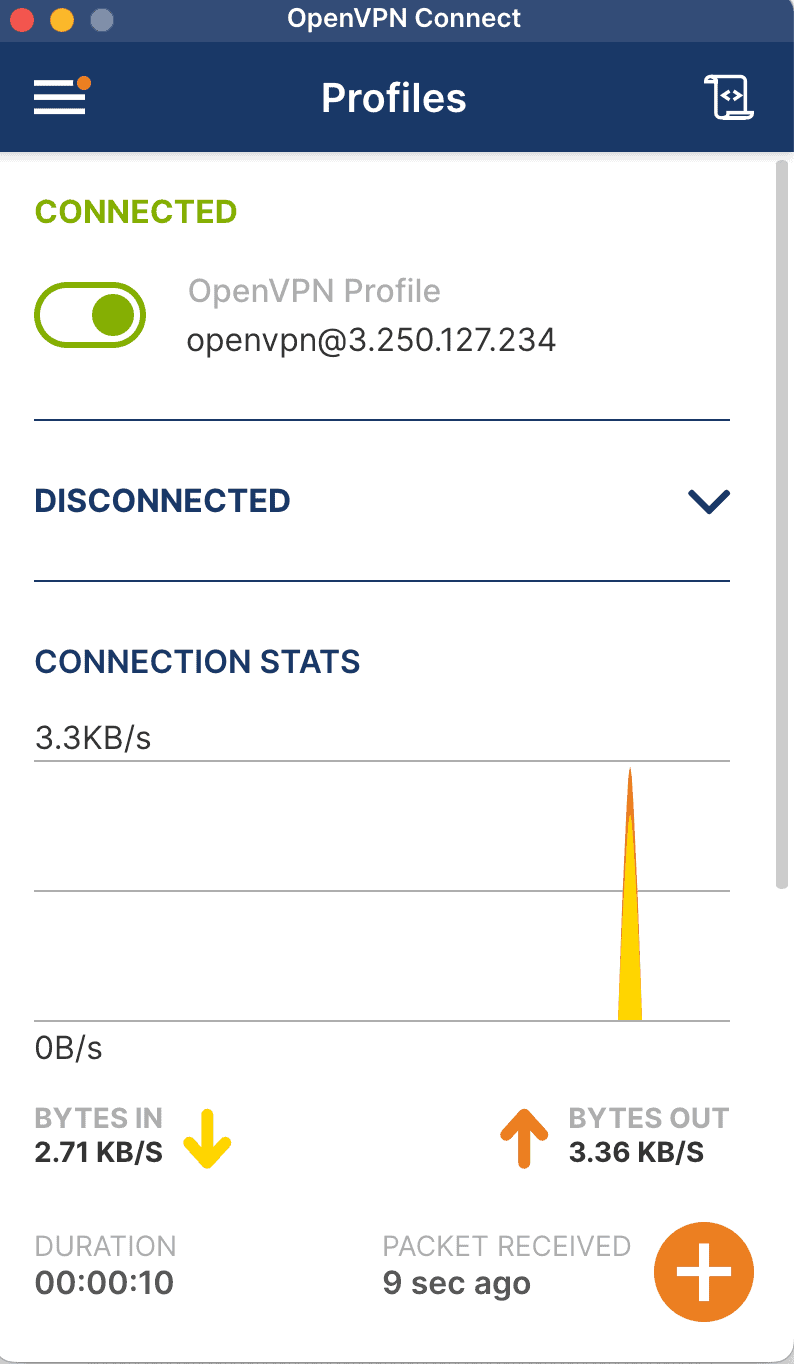 |
Bağlantı sonrası agent üzerinde bağlantının gerçekleştiğini görebilirsiniz
Admin panele geldiğinizde burada aktif bağlantıları takip edebilirsiniz.

Open vpn kurulum işlemi bu kadar.
Let’s encrypt ile ssl sertifika yapılandırması
Şu an vpn serveırmız publicten erişimde ssl uyarısı vermekte bunu free ssl veren Lets encrypt ile çözeceğiz.
Orjinal Makaleye bu linkten erişebilirsiniz.
yani https://vpn.sbaylab.com adresi üzerinden erişilebilir yapacağım bu sunucuyu, buradaki FQDN bölümü sizin kendi domain adresiniz olacak.
bunun için DNS panelimde A kaydımı aşağıdaki şekilde oluşturuyorum.
vpn.sbaylab.com A 3.250.127.234
Vpn makineme ssh yaparak cerbot kurulumunu aşağıdaki komutlarla yapıyorum.
sudo su
apt update && apt -y install certbot
Aşağıdaki komutu çalıştırarak SSL sertifika isteğini oluşturuyoruz.
certbot certonly --standalone --preferred-challenges http -d vpn.sbaylab.com
Komutu çalışıtırdığınızda bir mail adresi girmelisiniz bu sayede sertifika süresi bitmeden size bilgi maili ulaşıyor olacak

SSL işlemi tamamlandığına göre bu ssl i open vpn in kullanacağı şekilde yapılandırabiliriz.
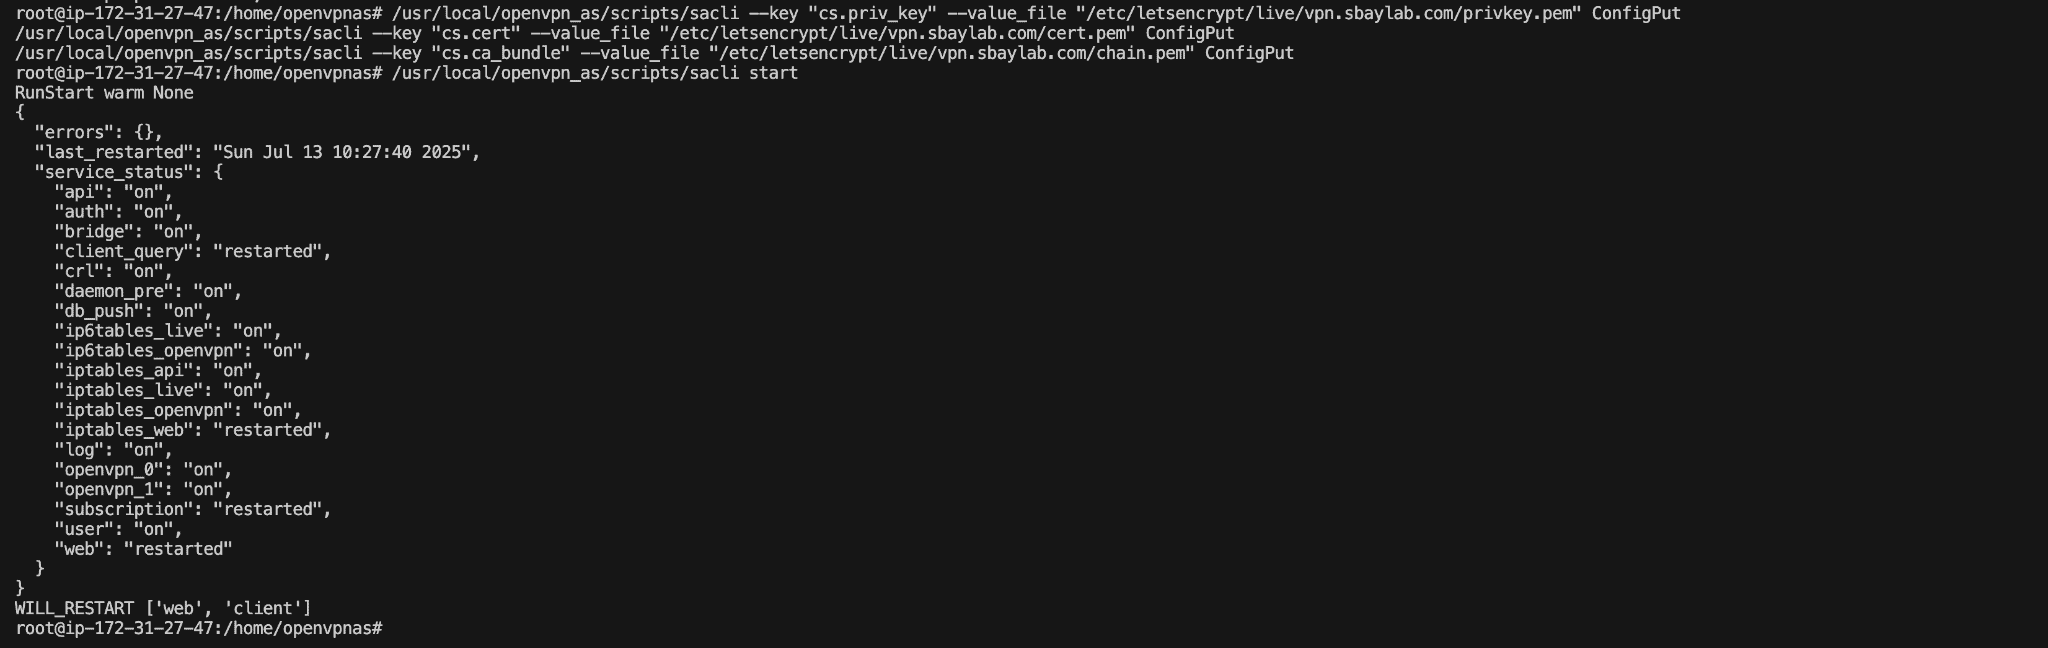
Aşağıdaki komutu çalıştırarak SSL i open vpn e import ediyoruz.
sudo su
/usr/local/openvpn_as/scripts/sacli --key "cs.priv_key" --value_file "/etc/letsencrypt/live/vpn.sbaylab.com/privkey.pem" ConfigPut
/usr/local/openvpn_as/scripts/sacli --key "cs.cert" --value_file "/etc/letsencrypt/live/vpn.sbaylab.com/cert.pem" ConfigPut
/usr/local/openvpn_as/scripts/sacli --key "cs.ca_bundle" --value_file "/etc/letsencrypt/live/vpn.sbaylab.com/chain.pem" ConfigPut
Servisimizi start ediyoruz.
/usr/local/openvpn_as/scripts/sacli start
Bu adımdan sonra vpn bağlantımızın başarılı bir şekilde ssl ile çalıştığını görebilirsiniz.

Bu adımla birlikte agent kurulu makinelerde ip adresi yerine “vpn.sbaylab.com” girerek secure bağlantı sağlayabilirsiniz.
cerbot ile sertifika yenileme komutu manual tetiklemek için kullanılır.
sudo certbot renew --dry-run
Cerbot otomatik SSL yenileme
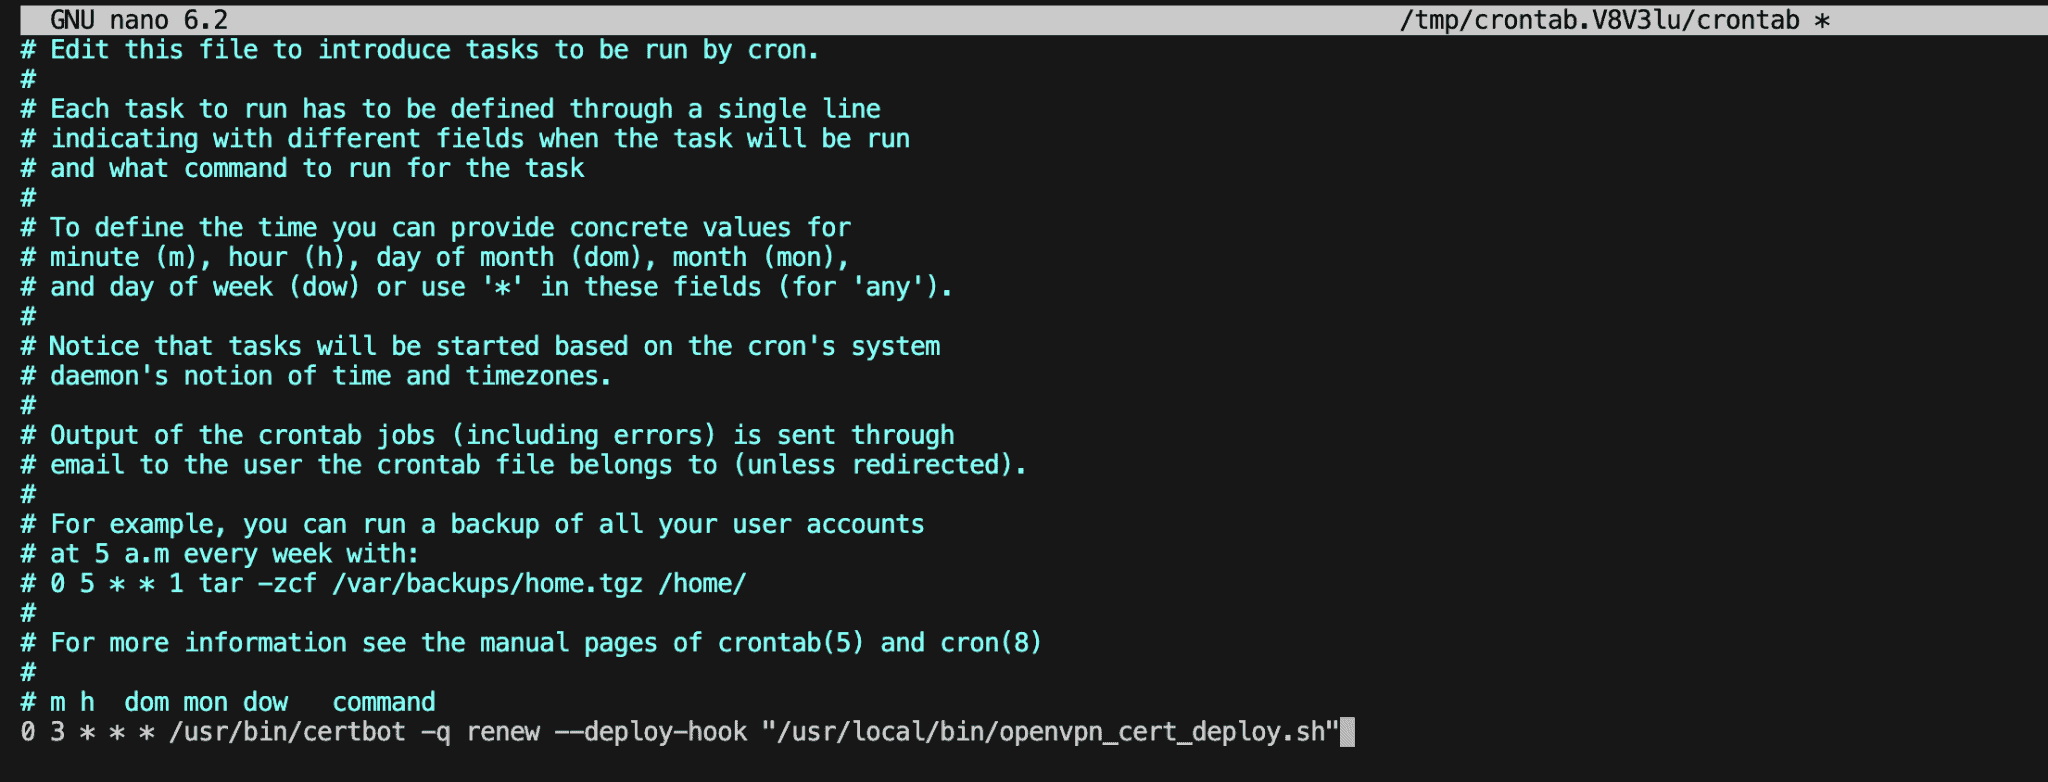
Letsh sertifikası her 90 günde bir yenilenir bu işlem otomatik yapılıyor fakat yeni sertifikanın open vpn e kullanılan sertifika olarak aktarılması için aşağıdaki işlemi yapıyoruz.
sudo crontab -e
0 3 * * * /usr/bin/certbot -q renew --deploy-hook "/usr/local/bin/openvpn_cert_deploy.sh"
Yukarıdaki komutu otomatik olarak çalıştırarak bu işlemi de otomatize etmiş oluyoruz.
şimdi gerekli olan scripti ekliyoruz.
sudo nano /usr/local/bin/openvpn_cert_deploy.sh
Dosya içerisine aşağıdaki bölümü yapıştırıyoruz.
#!/bin/bash

DOMAIN="vpn.sbaylab.com"
CERT_PATH="/etc/letsencrypt/live/$DOMAIN"

/usr/local/openvpn_as/scripts/sacli --key "cs.priv_key" --value_file "$CERT_PATH/privkey.pem" ConfigPut
/usr/local/openvpn_as/scripts/sacli --key "cs.cert" --value_file "$CERT_PATH/fullchain.pem" ConfigPut
/usr/local/openvpn_as/scripts/sacli --key "cs.ca_bundle" --value_file "$CERT_PATH/chain.pem" ConfigPut
/usr/local/openvpn_as/scripts/sacli start
Doyaya çalıştırma iznini veriyoruz.
sudo chmod +x /usr/local/bin/openvpn_cert_deploy.sh
Multifactor Authentication Configuration
Günümüzün olmazsa olmazı MFA doğrulamayı daha güvenli bir vpn bağlantısı için aktif etmek isterseniz
https://vpn.sbaylab.com:943/admin/ adresine gidiyoruz.
Authentication Menüsüne girip
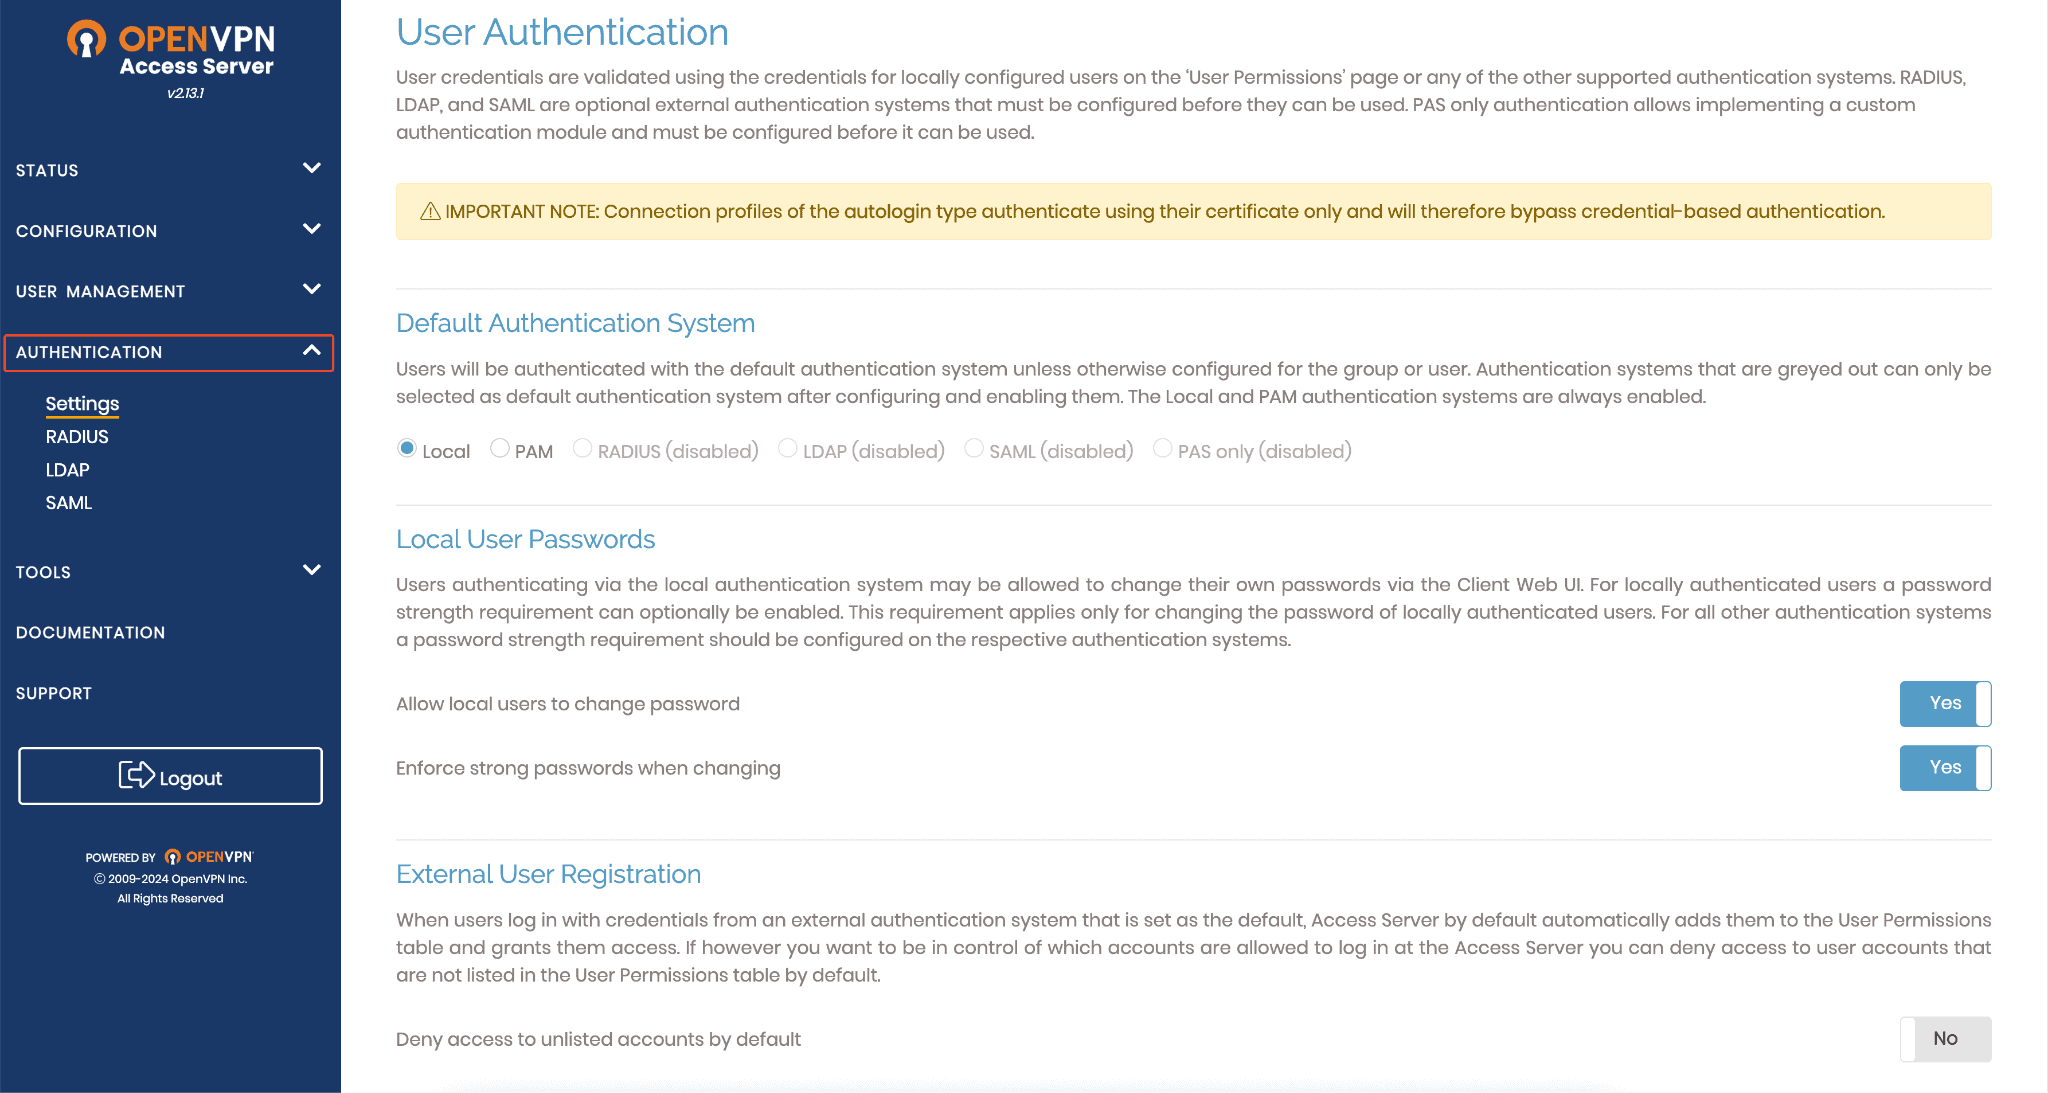
“TOTP Multi-Factor Authentication” ı aktif ediyoruz.
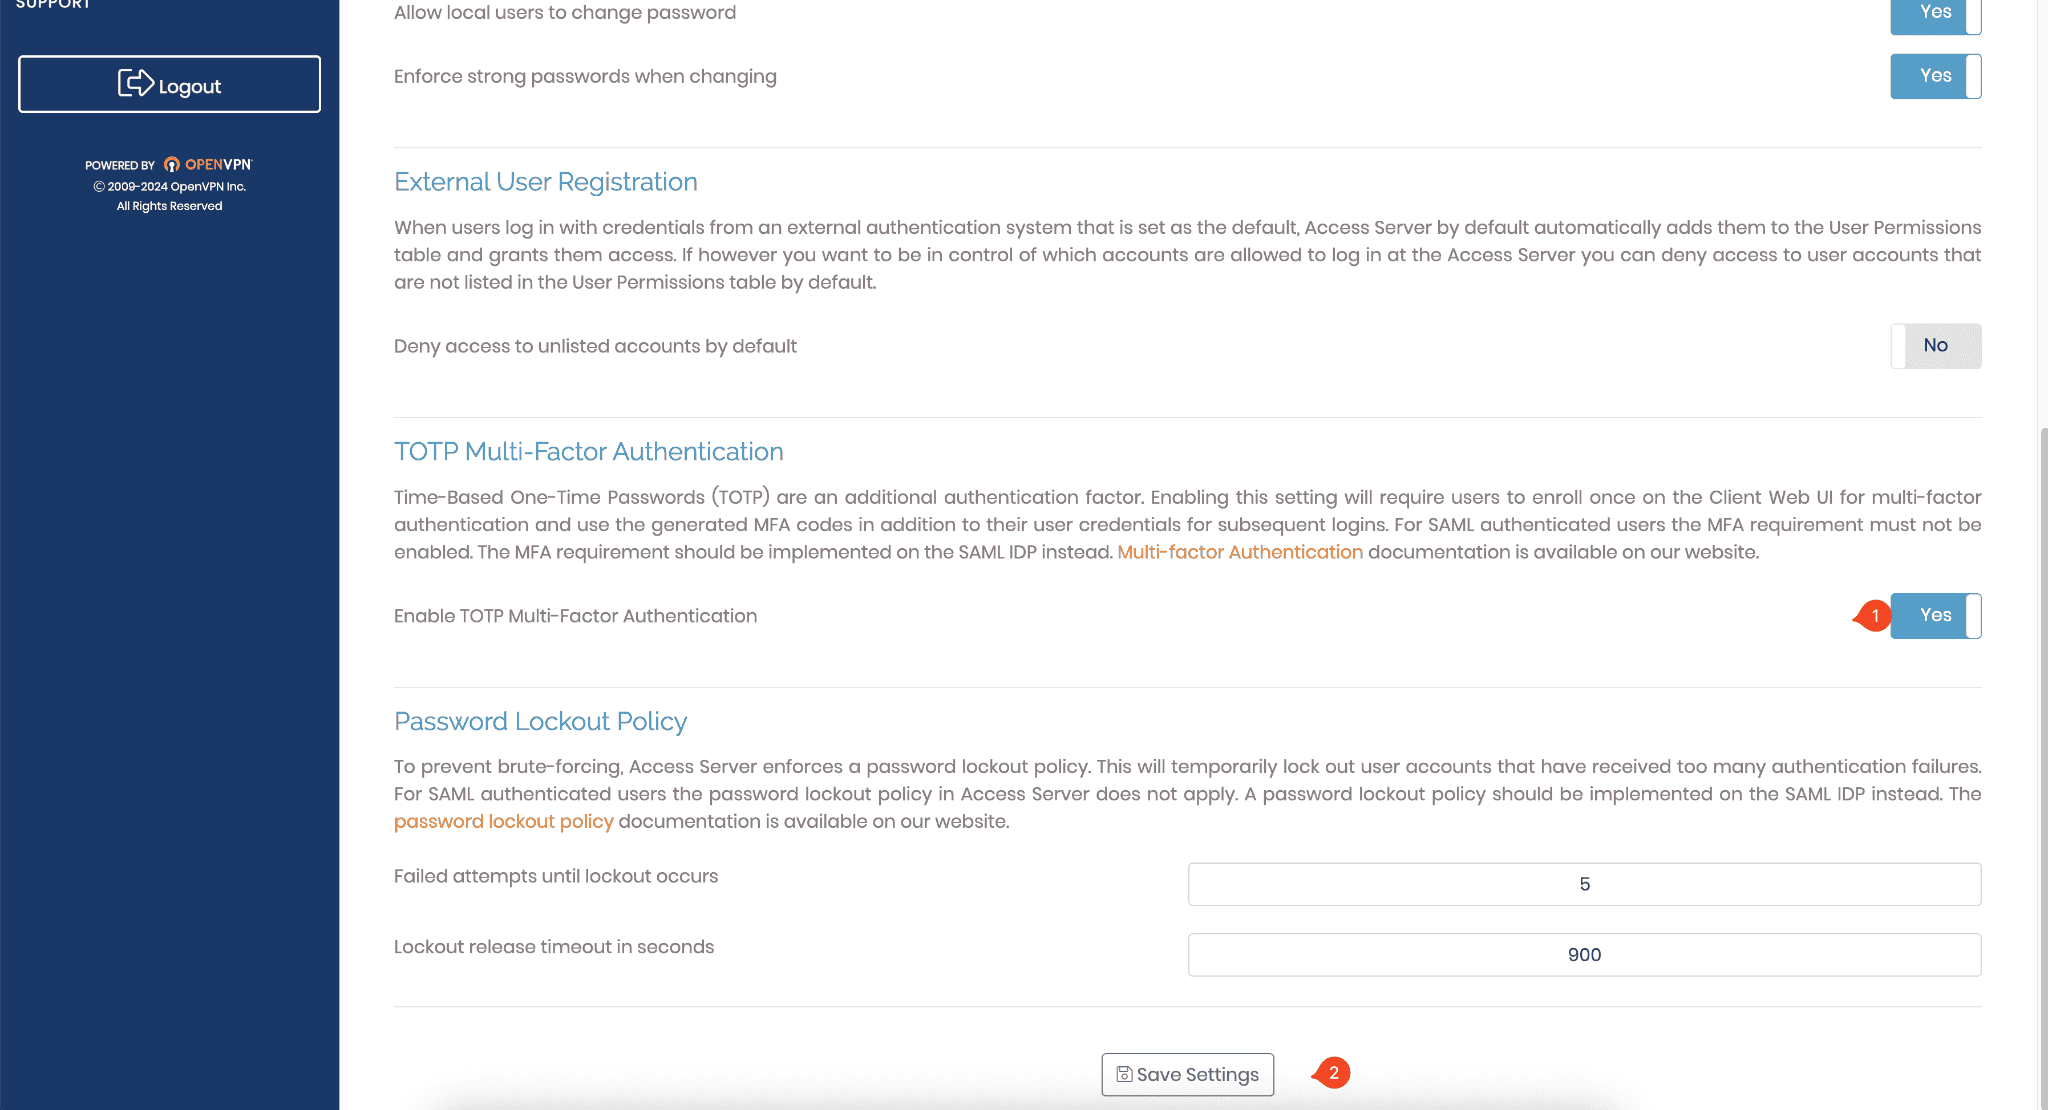
Bu adımdan sonra servisimizi restart ediyoruz.
sudo systemctl restart openvpnas
Tekrar login olmaya çalıştığmızda bizi aşağıdaki ekran karşılıyor.
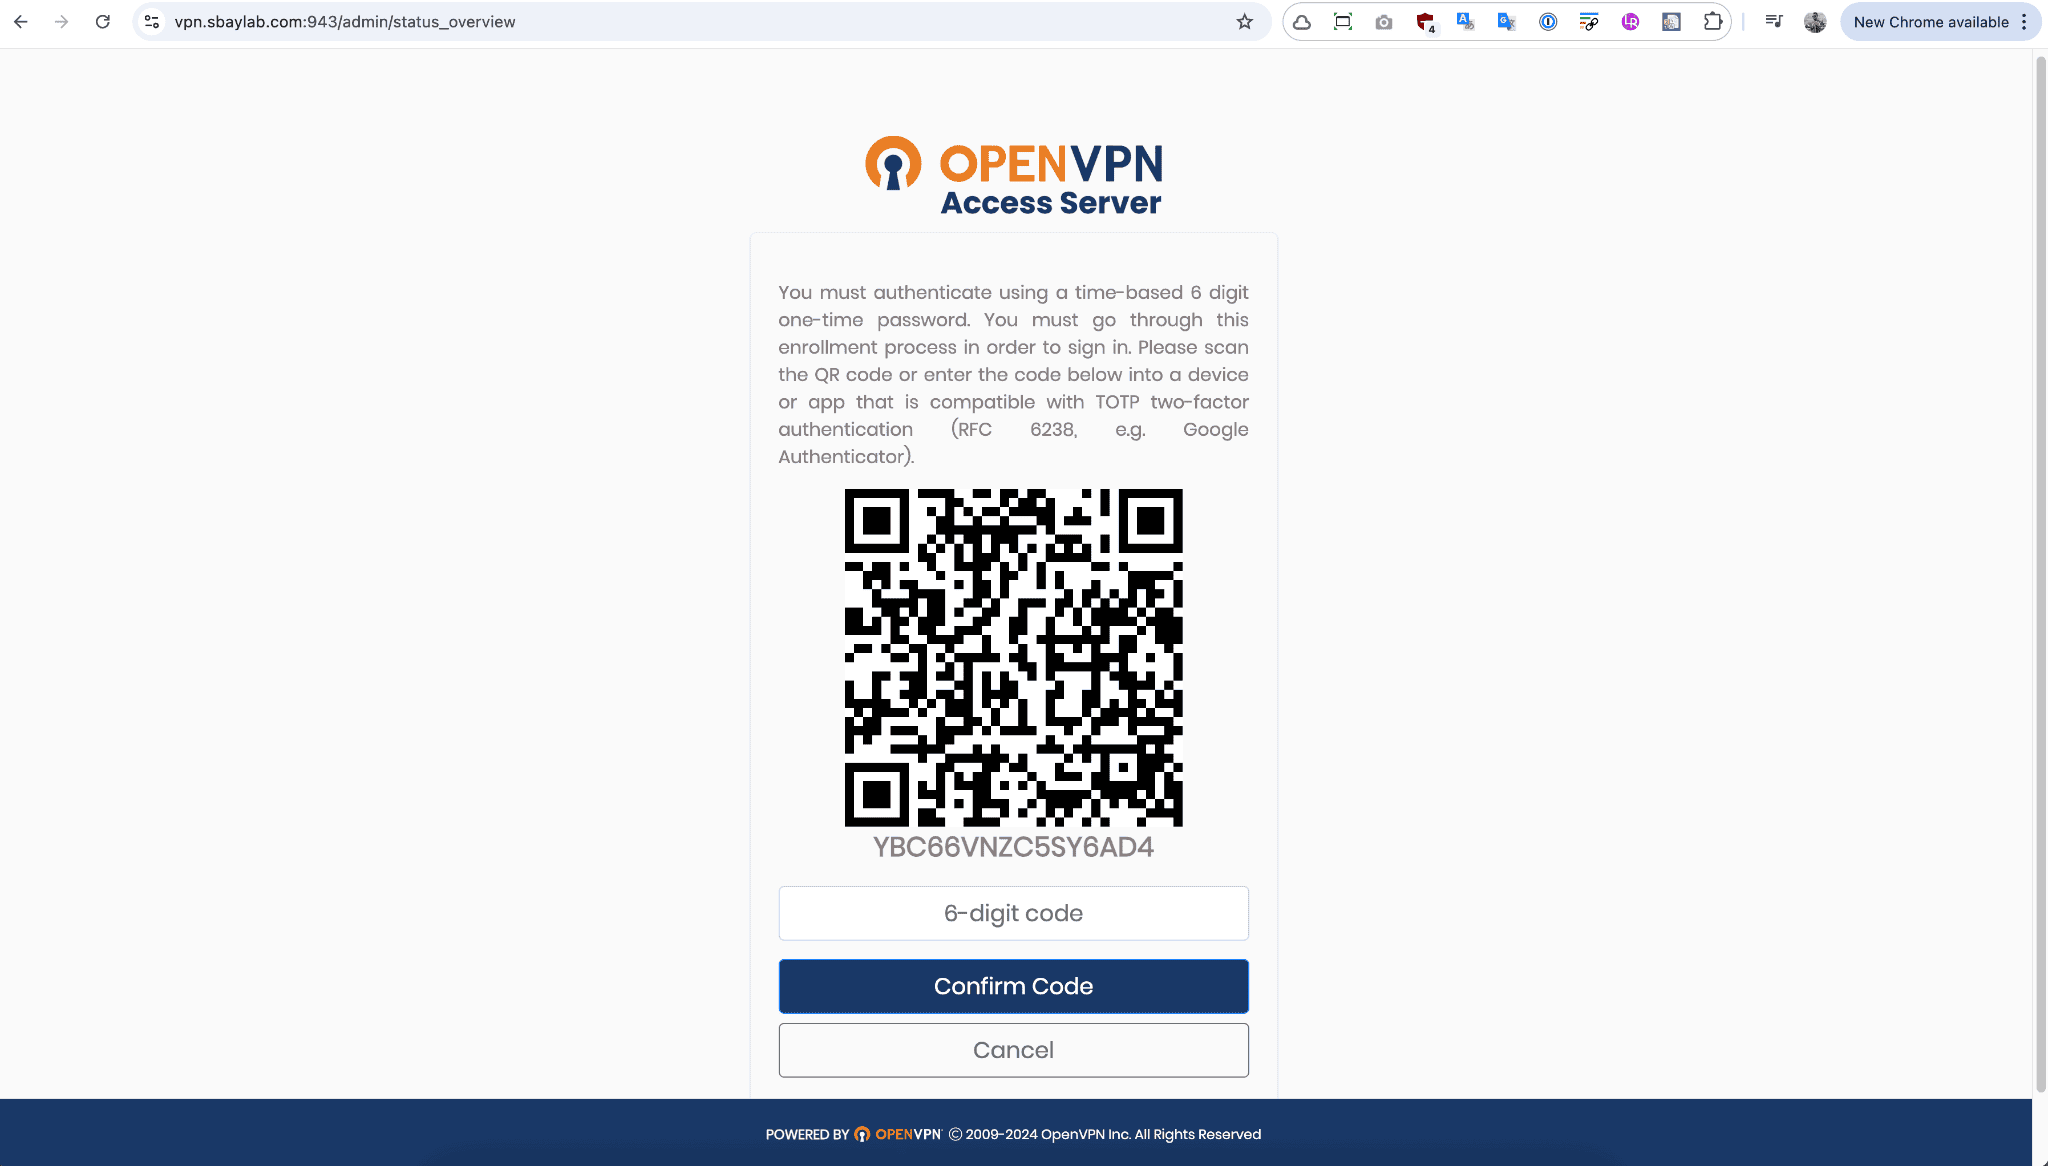
Bu ekranda google authentication ile qr tanımını yaparak MFA üzerinden güvenli bağlantımızı artık gerçekleştirebiliriz.
Bu adım sonrası tüm agent larda MFA aktif olacaktır.
 |  |
|---|
Kurulum Cli çıktısı
Welcome to OpenVPN Access Server Appliance 2.13.1
* Documentation: https://help.ubuntu.com
* Management: https://landscape.canonical.com
* Support: https://ubuntu.com/pro
System information as of Sun Jul 13 09:04:14 UTC 2025
System load: 0.0 Processes: 97
Usage of /: 28.1% of 7.57GB Users logged in: 0
Memory usage: 10% IPv4 address for eth0: 172.31.27.47
Swap usage: 0%
Expanded Security Maintenance for Applications is not enabled.
1 update can be applied immediately.
1 of these updates is a standard security update.
To see these additional updates run: apt list --upgradable
Enable ESM Apps to receive additional future security updates.
See https://ubuntu.com/esm or run: sudo pro status
The list of available updates is more than a week old.
To check for new updates run: sudo apt update
New release '24.04.2 LTS' available.
Run 'do-release-upgrade' to upgrade to it.
To run a command as administrator (user "root"), use "sudo <command>".
See "man sudo_root" for details.
OpenVPN Access Server
Initial Configuration Tool
------------------------------------------------------
OpenVPN Access Server End User License Agreement (OpenVPN-AS EULA)
1. Copyright Notice: OpenVPN Access Server License;
Copyright (c) 2009-2024 OpenVPN Inc. All rights reserved.
"OpenVPN" is a trademark of OpenVPN Inc.
2. Redistribution of OpenVPN Access Server binary forms and related documents,
are permitted provided that redistributions of OpenVPN Access Server binary
forms and related documents reproduce the above copyright notice as well as
a complete copy of this EULA.
3. You agree not to reverse engineer, decompile, disassemble, modify,
translate, make any attempt to discover the source code of this software,
or create derivative works from this software.
4. The OpenVPN Access Server is bundled with other open source software
components, some of which fall under different licenses. By using OpenVPN
or any of the bundled components, you agree to be bound by the conditions
of the license for each respective component. For more information, you can
find our complete EULA (End-User License Agreement) on our website
(http://openvpn.net), and a copy of the EULA is also distributed with the
Access Server in the file /usr/local/openvpn_as/license.txt.
5. This software is provided "as is" and any expressed or implied warranties,
including, but not limited to, the implied warranties of merchantability
and fitness for a particular purpose are disclaimed. In no event shall
OpenVPN Inc. be liable for any direct, indirect, incidental,
special, exemplary, or consequential damages (including, but not limited
to, procurement of substitute goods or services; loss of use, data, or
profits; or business interruption) however caused and on any theory of
liability, whether in contract, strict liability, or tort (including
negligence or otherwise) arising in any way out of the use of this
software, even if advised of the possibility of such damage.
6. OpenVPN Inc. is the sole distributor of OpenVPN Access Server
licenses. This agreement and licenses granted by it may not be assigned,
sublicensed, or otherwise transferred by licensee without prior written
consent of OpenVPN Inc. Any licenses violating this provision
will be subject to revocation and deactivation, and will not be eligible
for refunds.
7. Subscription License Key: Entitles you to use this software for the
duration of term of your subscription up to the concurrent user limit
specified by your subscription. This license permits you to use the
software on one or more servers, provided that in no event will the number
of concurrent VPN connections that all servers may allow exceed the
concurrent user limit. Upon activation of the first purchased activation
key for this software, you agree to forego any free licenses or keys that
were given to you for demonstration purposes, and as such, the free
licenses will not appear after the activation of a purchased key. You are
responsible for the timely activation of these licenses on the server or
servers of your choice.
Refunds on purchased activation keys are only possible within 30 days of
purchase of activation key, and then only if the activation key has not
already been activated on a system. To request a refund, contact us through
our support ticket system using the account you have used to purchase the
activation key. Activated subscriptions are nontransferable. Access Server
Subscription entitles the use of (1) subscription license key on a single
server or across multiple servers. Once an activated key expires or becomes
invalid, the concurrency limit on our software product will revert to
demonstration mode, which allows a maximum of two (2) concurrent users to
be connected to your server. Prior to your subscription license expiration,
OpenVPN Inc. will, depending on your purchase selection, either auto-renew
your subscription, or attempt to remind you to renew your subscription by
sending periodic email messages to the licensee email address on record.
You are solely responsible for the timely renewal of your activation key(s)
prior to their expiration if continued operation is expected after the
subscription term ends. OpenVPN Inc. will not be responsible for any
misdirected and/or undeliverable email messages, nor does it have an
obligation to contact you regarding your subscription term's expiry.
8. Standard Non-Subscription License Key(s) also called Fixed License Key(s):
A Purchased Standard Non-Subscription license entitles you to use this
software for the duration of time denoted on your activation key on any one
(1) particular device, up to the concurrent user limit specified by your
license. Multiple activation keys may be activated to achieve a desired
concurrency limit on this given device. Unless otherwise prearranged with
OpenVPN Inc., concurrency counts on activation keys are not to be divided
for use amongst multiple devices. Upon activation of the first purchased
activation key in this software, you agree to forego any free licenses or
keys that were given to you for demonstration purposes, and as such, the
free licenses will not appear after the activation of a purchased key. You
are responsible for the timely activation of these licenses on your desired
server of choice. Refunds on purchased activation keys are only possible
within 30 days of purchase of activation key, and then only if the
activation key has not already been activated on a system. To request a
refund, contact us through our support ticket system using the account you
have used to purchase the activation key.
Activating a standard Non-Subscription key ties it to the specific
hardware/software combination that it was activated on, and activated
activation keys are nontransferable. Substantial software and/or hardware
changes may invalidate an activated license. In case of substantial
software and/or hardware changes, caused by for example, but not limited to
failure and subsequent repair or alterations of (virtualized)
hardware/software, our software product will automatically attempt to
contact our online licensing systems to renegotiate the licensing state. On
any given activation key, you are limited to three (3) automatic
renegotiations within the activation key lifetime. After these
renegotiations are exhausted, the activation key is considered invalid, and
the activation state will be locked to the last valid system configuration
it was activated on. OpenVPN Inc. reserves the right to grant exceptions to
this policy for license holders under extenuating circumstances, and such
exceptions can be requested through a ticket via the OpenVPN Access Server
ticketing system.
Once an activated activation key expires or becomes invalid, the
concurrency limit on our software product will decrease by the number of
concurrent connections previously granted by the activation key. If all
purchased activation key(s) have expired, the product will revert to
demonstration mode, which allows a maximum of two (2) concurrent users to
be connected to your server. Prior to your license expiration date(s),
OpenVPN Inc. will attempt to remind you to renew your license(s) by sending
periodic email messages to the licensee email address on record. You are
solely responsible for the timely renewal of your activation key(s) prior
to their expiration if continued operation is expected after the license
expiration date(s). OpenVPN Inc. will not be responsible for any
misdirected and/or undeliverable email messages, nor does it have an
obligation to contact you regarding your expiring activation keys.
9. Once an activated activation key expires or becomes invalid, the
concurrency limit on our software product will decrease by the amount of
concurrent connections previously granted by the activation key. If all of
your purchased activation key(s) have expired, the product will revert to
demonstration mode, which allows a maximum of two (2) concurrent users to
be connected to your server. Prior to your license expiration date(s),
OpenVPN Inc. will attempt to remind you to renew your license(s) by sending
periodic email messages to the licensee email address on record. You are
solely responsible for the timely renewal of your activation key(s) prior
to their expiration if continued operation is expected after the license
expiration date(s). OpenVPN Inc. will not be responsible for any
misdirected and/or undeliverable email messages, nor does it have an
obligation to contact you regarding your expiring activation keys.
10. Any valid activation key holder is entitled to use our ticketing system for
support questions or issues specifically related to the OpenVPN Access
Server product. To file a ticket, go to our website at https://openvpn.net/
and sign in using the account that was registered and used to purchase the
activation key(s). You can then access the support ticket system through
our website and submit a support ticket. Tickets filed in the ticketing
system are answered on a best-effort basis. OpenVPN Inc. staff reserve the
right to limit responses to users of our demo / expired licenses, as well
as requests that substantively deviate from the OpenVPN Access Server
product line. Tickets related to the open source version of OpenVPN may
not be handled here.
11. Purchasing an activation key does not entitle you to any special rights or
privileges, except the ones explicitly outlined in this user agreement.
Unless otherwise arranged prior to your purchase with OpenVPN Inc.,
software maintenance costs and terms are subject to change after your
initial purchase without notice. In case of price decreases or special
promotions, OpenVPN Inc. will not retrospectively apply credits or price
adjustments toward any licenses that have already been issued. Furthermore,
no discounts will be given for license maintenance renewals unless this is
specified in your contract with OpenVPN Inc.
Please enter 'yes' to indicate your agreement [no]: yes
Once you provide a few initial configuration settings,
OpenVPN Access Server can be configured by accessing
its Admin Web UI using your Web browser.
Will this be the primary Access Server node?
(enter 'no' to configure as a backup or standby node)
> Press ENTER for default [yes]: yes
Please specify the network interface and IP address to be
used by the Admin Web UI:
(1) all interfaces: 0.0.0.0
(2) eth0: 172.31.27.47
Please enter the option number from the list above (1- 2).
> Press Enter for default [1]: 1
What public/private type/algorithms do you want to use for the OpenVPN CA?
Recommended choices:
rsa - maximum compatibility
secp384r1 - elliptic curve, higher security than rsa, allows faster connection setup and smaller user profile files
showall - shows all options including non-recommended algorithms.
> Press ENTER for default [secp384r1]:
What public/private type/algorithms do you want to use for the self-signed web certificate?
Recommended choices:
rsa - maximum compatibility
secp384r1 - elliptic curve, higher security than rsa, allows faster connection setup and smaller user profile files
showall - shows all options including non-recommended algorithms.
> Press ENTER for default [secp384r1]:
Please specify the port number for the Admin Web UI.
> Press ENTER for default [943]:
Please specify the TCP port number for the OpenVPN Daemon
> Press ENTER for default [443]:
Should client traffic be routed by default through the VPN?
> Press ENTER for default [no]:
Should client DNS traffic be routed by default through the VPN?
> Press ENTER for default [no]:
Admin user authentication will be local
Private subnets detected: ['172.31.0.0/16']
Should private subnets be accessible to clients by default?
> Press ENTER for EC2 default [yes]:
To initially login to the Admin Web UI, you must use a
username and password that successfully authenticates you
with the host UNIX system (you can later modify the settings
so that RADIUS or LDAP is used for authentication instead).
You can login to the Admin Web UI as "openvpn" or specify
a different user account to use for this purpose.
Do you wish to login to the Admin UI as "openvpn"?
> Press ENTER for default [yes]:
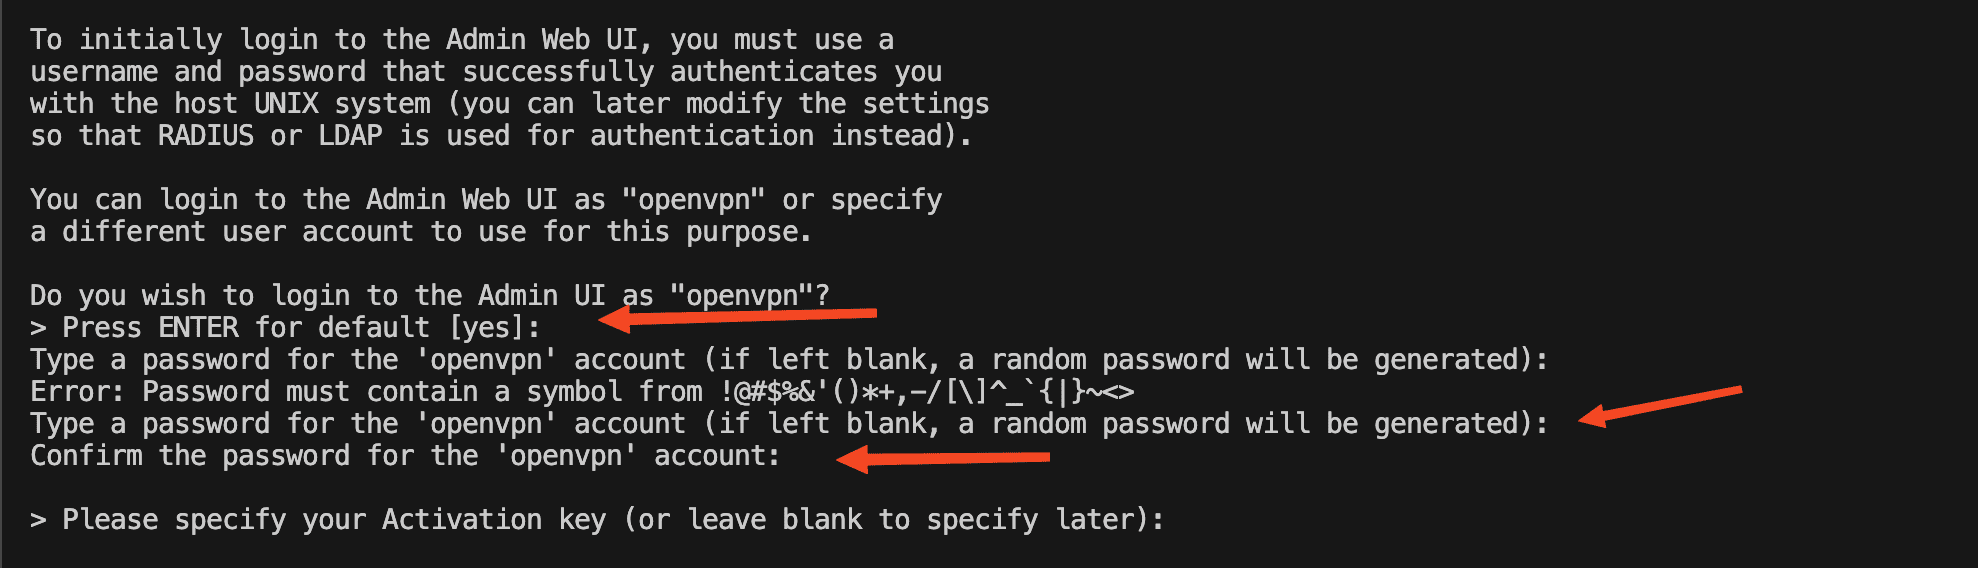
Type a password for the 'openvpn' account (if left blank, a random password will be generated):
Error: Password must contain a symbol from !@#$%&'()*+,-/[\]^_`{|}~<>
Type a password for the 'openvpn' account (if left blank, a random password will be generated):
Confirm the password for the 'openvpn' account:
> Please specify your Activation key (or leave blank to specify later):
Initializing OpenVPN...
Removing Cluster Admin user login...
userdel: user 'admin_c' does not exist
Writing as configuration file...
Perform sa init...
Wiping any previous userdb...
Creating default profile...
Modifying default profile...
Adding new user to userdb...
Modifying new user as superuser in userdb...
Setting password in db...
Getting hostname...
Hostname: 3.250.127.234
Preparing web certificates...
Getting web user account...
Adding web group account...
Adding web group...
groupadd: group 'openvpn_as' already exists
Adjusting license directory ownership...
Initializing confdb...
Initial version is not set. Setting it to 2.13.1...
Generating PAM config for openvpnas ...
Enabling service
Created symlink /etc/systemd/system/multi-user.target.wants/openvpnas.service → /lib/systemd/system/openvpnas.service.
Starting openvpnas...
NOTE: Your system clock must be correct for OpenVPN Access Server
to perform correctly. Please ensure that your time and date
are correct on this system.
Initial Configuration Complete!
You can now continue configuring OpenVPN Access Server by
directing your Web browser to this URL:
https://3.250.127.234:943/admin
During normal operation, OpenVPN AS can be accessed via these URLs:
Admin UI: https://3.250.127.234:943/admin
Client UI: https://3.250.127.234:943/
To login please use the "openvpn" account with the password you specified during the setup.
See the Release Notes for this release at:
https://openvpn.net/vpn-server-resources/release-notes/
openvpnas@ip-172-31-27-47:~$