Exchange Migration Serisi 2013 –>2016 Bölüm-3


Mailbox Taşıma işlemleri
Posta kutularını Exchange Server 2013’ e taşıyoruz.
Evet, bir adımı daha tamamladık, şimdi sıra geldi eski posta kutularını yeni sisteme taşımaya. Temel olarak Exchange Server 2013 üzerinde 3 temel posta kutusu taşıma mantığı vardır.
Local: Tek bir forest içerisinde posta kutusu taşıma
Cross-Forest: Farklı Exchange Forest ları arasında posta kutusu taşıma
Remote: On-Premises yani local Exchange Server ile Online arasında kullanıcı taşıma
Biz burada local taşıma yapacağız.
Exchange Server tarafında posta kutularını taşımak için pek çok sebep vardır.
1 – Upgrade; Aynı bizde olduğu gibi eski bir sürümden yeni bir sürüme geçiş için.
2 – Realignment; Bir posta kutusunu bir mailbox veri tabanından limitleri daha yüksek bir mailbox veri tabanına taşıyarak kotasını değiştirmek için.
3 – Investigate an issue; Eğer bir posta kutusu üzerinde araştırma yapmak istiyorsanız bu posta kutusunu başka bir mail server üzerine taşıyabilirsiniz.
4 – Corrupted mailboxes; Bozulmuş posta kutularının düzenlenmesi için kullanılabilir.
5 – Physical location changes; Bir çalışanın şirketin farklı bir şubesine gitmesi sonucu posta kutusunu o site için hizmet veren mailbox sunucusuna taşıyabilirsiniz.
Bunun gibi örnekleri çoğaltmak mümkün. Bizim amacımız yükseltme işlemi için bir taşıma işlemi olacaktır.
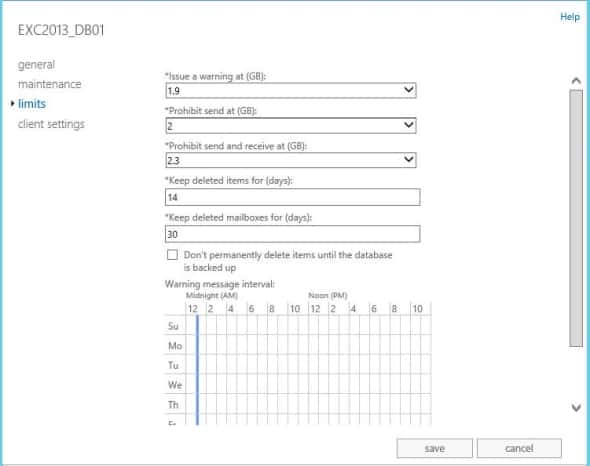
Taşımadan önce dikkat etmeniz gereken önemli bir konu kotalardır. Eğer mevcut kullanıcı posta kutusu boyutu hedef mailbox veri tabanı limitlerinden yüksek ise hata alacaksınız. Bu nedenle öncelikle taşıma işleminden önce Exchange Server 2013 üzerindeki mailbox database varsayılan limitlerini kontrol edin.
Bu kadar Ön bilgiden sonra artık taşıma işlemine geçebiliriz.
Recipientsàmigration Tabına geliyoruz ve “+” butonuna basaran move to a different database seçeneğini seçerek taşıma işlemine başlıyoruz.
Karşımıza gelen ekranda ilk olarak ben Administrator hesabını taşıyacağım. Hesabımı seçip add diyorum.

Karşımıza gelen ekranda ilk olarak ben Administrator hesabını taşıyacağım. Hesabımı seçip add diyorum.

Yapacağım taşıma işlemine bir isim veriyorum.

isterseniz taskları oluşturup uygun zamanda manual olarka ta başlata bilirsiniz isterseniz de buraya program yazarak istediğiniz saatte başlamasını sağlayabilirsiniz. Ben hemen yap ve işlem bittiğinde administrator’a mail gönder diyerek devam ediyorum.

Bu adımdan sonra işlem tamamlanıyor.
aşağıdaki grödüğünüz gibi kaç adet item taşınmış taşıma durumu nedir gibi detayları bu ekrandan takip edebiliyoruz.

Ben 2. Bir taşıma işlemi gerçekleştirerek EXC_2013 üzerinde bulunana bütün mailboxları taşıyorum ve Exchagne 2013 makinem üzerinde hiç bir mailbox Db i bırakmıyorum

Komut ile mailbox taşıma
Mailbox taşımalarını manuel olarak powershell üzerinden yapmak isterseniz aşağıdaki komutlardan faydalanabilirsiniz.
Taşıma komutu
*New-MoveRequest -Identity ‘sbayram@serdarbayram.local -TargetDatabase “EXC2013_DB01” -BadItemLimit10000 –AcceptLargeDataLoss
* New-MoveRequest –Identity ‘user name’ –TargetDatabase ‘Database Name’
New-MoveRequest –Identity ‘sbayram –TargetDatabase ‘EXC2013_DB01
Taşıma işleminin durumunu Kullanıcı bazında görüntülemek için aşağıdaki komutu kullanabilirsiniz.
Get-MoveRequestStatistics -Identity sbayram@serdarbayram.local
Taşıma işleminin durumunu Database bazında görüntülemek için aşağıdaki komutu kullanabilirsiniz.
Get-MoveRequestStatistics -MoveRequestQueue ” EXC2013_DB01″
Mailbox taşıma işlemlerinden sorna networkteki outlooklarda bağlandıkları serverın yeni exchange serverımız olduğunu görüyor olacağız.

DNS Yönlendirmesi
Bu adımdan sonra artık owa erişimini yeni krduğum exchange serverıma yönlendirebilirim. Bunun için AD üzerinde DNS Manager panelimi açıyorum ve burada exchange sever 2013 ye yönlendirilmiş MX kaydını exchange server 2016 makineme yönlendiriyorum.


Public Folder Migration İşlemleri
Yapımda Mailbox1 adında bir PublicFolder DB bulunmakta


Aşağıdaki komut ile Exc 2013 serverım üzerindeki Oluşturulmuş olan PF Db leri görüntülüyorum bende 1 adet pf DB bulunuyor.
Get-Mailbox -Server exc2013 -PublicFolder

bunu grafik arayüzü üzerinde de görüntüleyebiliyoruz.

PF Taşıma işlemi
Aşağıdaki komutu Exchange 2016 üzerinde çalıştırdığımda herhangi bir DB getirmiyor arkadaşlar çünkü Exchange 2016 üzerinde henüz bir Pf Db i bulunmuyor.
Get-Mailbox -Server exc2016 –PublicFolder
Sıra geldi PF taşıma komutuna
New-MoveRequest Mailbox1 -TargetDatabase EXC2016_DB01
New-MoveRequest PublicfolderDbAdiniz -TargetDatabase TasimaYapacaginizDBAdiniz

Gördüğünüz gibi taşıma işlemi aşağıdaki gibi başarıyla gerçekleştir ve exchange 2016 üzerinde Pf
görüntüleme komutunu çalıştırdığımda Mailbox Pf DB in Yeni serverım Exchange 2016 üzerinde olduğunu görüyorum.

Grafik arayüzü üzerinden görüntülemek isterseniz Exchange 2016 Makinemizin ECP Paneline bağlanıp PF Mailbox DB in bulunduğu yere bakabilirsiniz.

Bu adımdan sonra Client makineler PF DB i hemen yeni serverdan almaya başlamıyor ve bu taşıma işleminin devreye girmesi yapınızın büyüklüğüne ve replikasyon topolojinize göre vakit alabilir .
Ben burada işi hızlandırmak için ortamdaki Exchange 2013 ve 2016 Serverlarımı restart ettim ve sonrasında Client makinelerde Outlookları kapatıp açtığımda aşağıda ki ekran alıntısında gördüğünüz gibi Tüm istemcilerim artık Outlook bağlantılarının tamamını ve PF bağlantılarını yeni exchange server 2016 üzerinden çağırmaya başladılar.

Bu aşamaya kadar EXChange server 2013 üzerindeki herşeyi yeni serverımız olan Exchange server 2016 üzerine taşıdık artık ve Exchange server 2013 ile ilgili bir bağlantımız kalmadı Exc 2013 ü ortamımızdan rahatlıkla kaldırabiliriz.
Bir Sonraki Makalemiz Exchgan 2013 ün ortamdan kaldırılması olacak.
Hazırlayan
Serdar BAYRAM


