Pfsense content and URL Filtering – Section 2 Proxy Filter


Hello Fellas in previous chapter we’ve discussed about Proxy Server(Squid) installation on PFSense.In this chapter we’ll discuss about build Squid Guard which using to URL content filterin
To build our settings ;
1-) Services –> Proxy Filter
Mark on Enable box and click on Apply to start service..

Ldap server kullanmadığımız için şu an bu kısıma dokunmuyoruz. Don’t have a Ldap Server so skip this section
On Login options as you can see i’ve choose Enable GUI log,log and log rotation
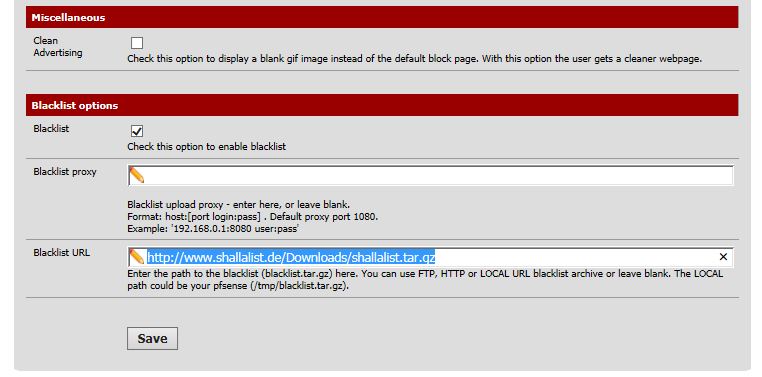
2-) Enter the path where you can update your BlackList URL

Black List Options ;
Black List : We mark to activate blacklist.
Black List URL : Calls asking where we are entering the following URL address aders here constantly updated. http://www.shallalist.de/Downloads/shallalist.tar.gz
3-)”Blacklist” As you can see http://www.shallalist.de/Downloads/shallalist.tar.gz here as well.Then click on download the newest blacklist archive

4-) We have BlackList Log now click on Common ACL and click on green arrow and block list will appear

At the end of the page choose Defaut Access option as ALL.
Default Access (all )seçeneğine allow diyoruz.


5-)

Target
Rules : Rules : Deny rule for every user
Do not allow IP Addreses :To block bypassing the URL with simply using an IP address.
Proxy Denied Error : You can enter an Error Message in here.
Redirect Mode : You can direct your error message to a web side etc.
için Ext Url Move (Enter URL) modunu seçtim.
Redirect info : i write fllowing web address.
With this settings we’ve activated SG,blacklist downloaded.Default Rule set as “Deny”we’ve changed it as “Allow” with this setting every client surf on the internetnet without any restriction
Not : Every changing on SquidGuard you must click on Apply
6-) Now I’ll restrict improper WebSites.First,from ACL tab choosing category and set them to “Deny”.

7-)Alright as you can see we’ve tested our URL restriction and this screen appears with an error message
Created By
Serdar Bayram


